
Import & manage orders, inventory, product listings & price updates with Fyndiq: The biggest Swedish online bargain superstore
Add our Fyndiq connector to your Linnworks account to offer bargain products to millions of families and fashion-conscious buyers across Scandinavia.
The Fyndiq integration with Linnworks offers the following:
Order Management: Automatically download orders from Fyndiq to Linnworks. After orders are processed in Linnworks, the dispatch notification is transferred to Fyndiq
Inventory Management: Update stock from within Linnworks without needing to log into Fyndiq separately
Price Update: Manage product price from Linnworks to Fyndiq
Product Listing: List products from Linnworks to Fyndiq
Step 1: Integrate the Channel into Linnworks.net
The Fyndiq Connector is an application which is embedded in Linnworks, and developed and supported by eBusiness Guru Ltd.
- Log into Linnworks.net
- Select Settings in the left-hand menu bar
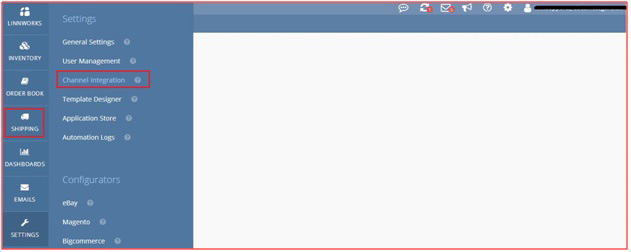
- Select Channel Integration.
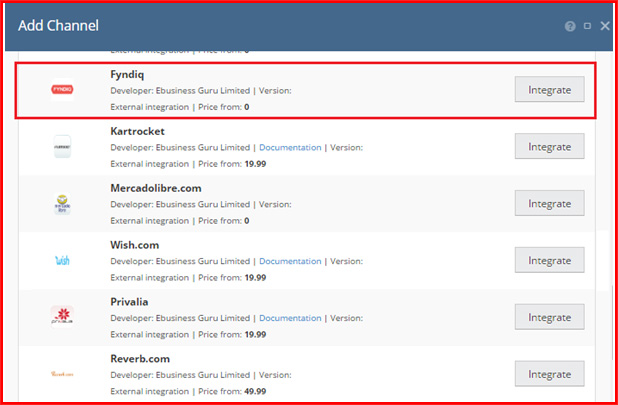
- Select Add New to return a list of available Channel Integrations.

- Locate Fyndiq.se on the list, and click Integrate.
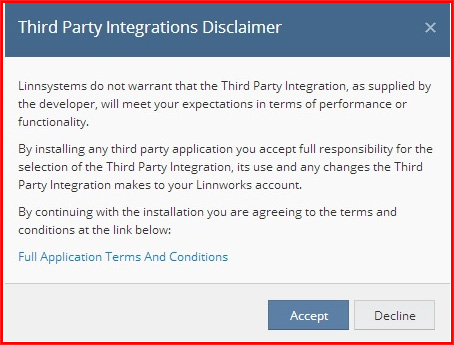
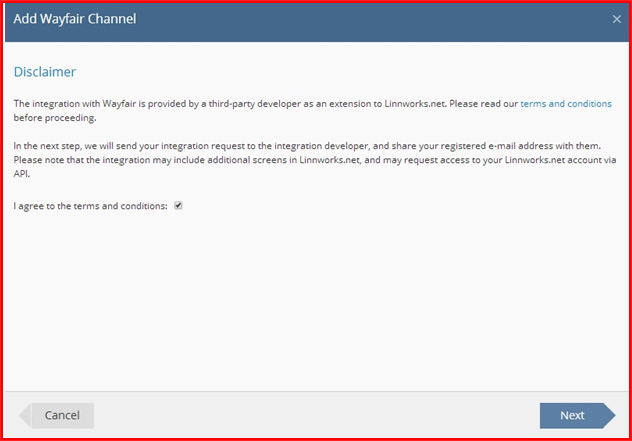
- After reading the warning, click Accept to move onto the next step of the integration. You can click on the link at the bottom to review the Terms and Conditions first.
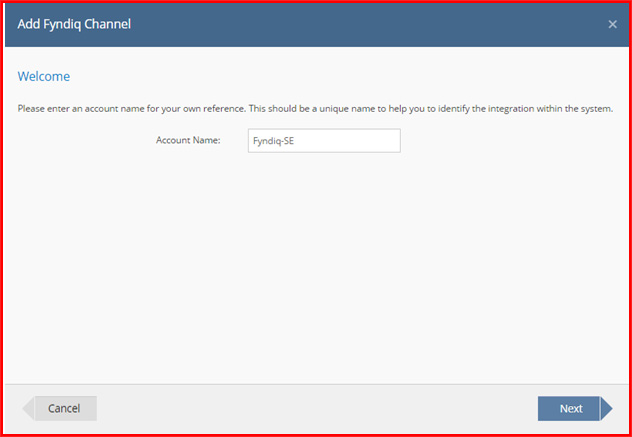
- Enter your Fyndiq.se account name to start the integration.
- After reading the Disclaimer, please tick I agree to the terms and conditions and click Next to continue integrating Fyndiq.
Follow the steps below for generating tokens. Those tokens are required in integration steps.
Generate Token:
Linnworks integration requires two types of tokens from Fyndiq.se.
Follow the steps below to generate the tokens.
- Navigate to the Fyndiq login page
- If you are not currently logged in, then do so
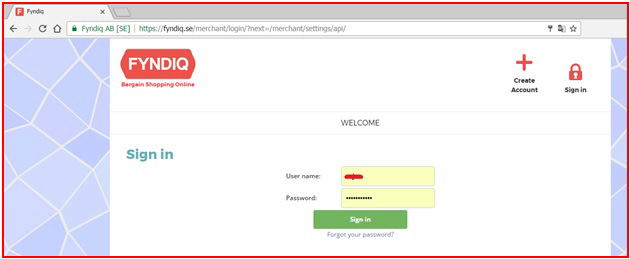
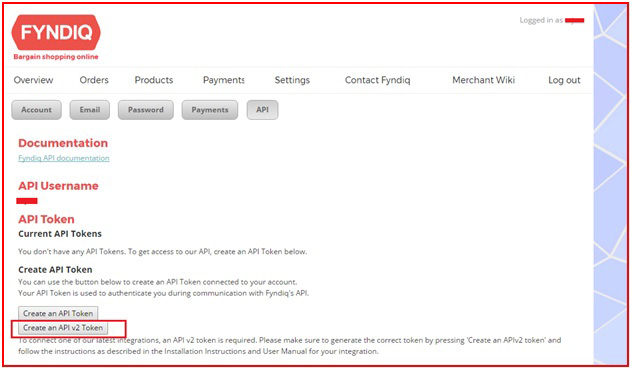
- The API Settings page will be opened
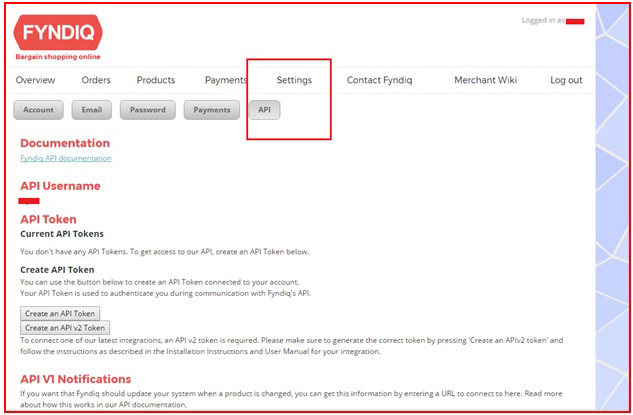
- Click on Create an API Token
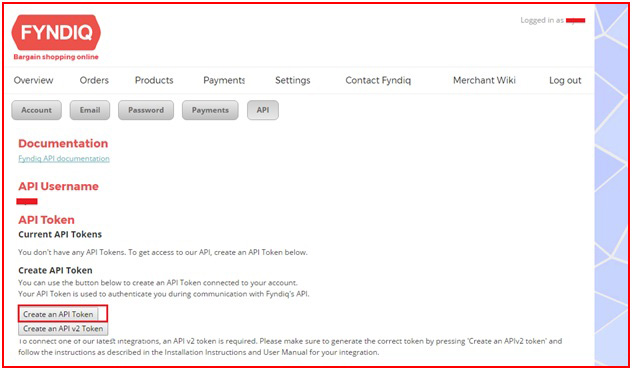
- Click on Create an API v2 Token. This step is important – make sure you create v2 Token!
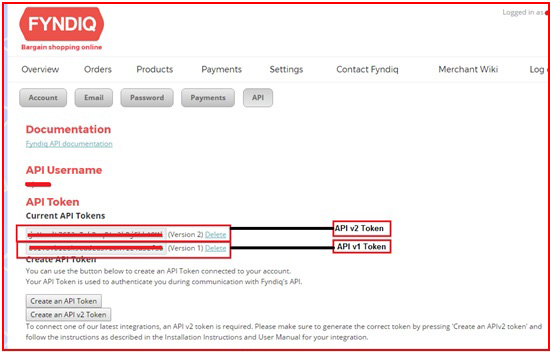
- Two API tokens will be generated. Copy and paste them into the integration as below.
To integrate a Fyndiq.se channel into Linnworks, you need the following information:
A) User name: When you register as a seller at Fyndiq.se, you will receive a username.
You will need this for the Fyndiq integration.
B) API v1 Token :
Use API v1 Token generated from above steps.
C) API v2 Token:
Use API v1 Token generated from above steps.
D) Country:
Select country of your Fyndiq.se account.
- Click Next to continue.
Step 2: Edit Channel Details

Account Status
- In Linnworks.net, select Settings.
- Select Channel Integration.
- Locate the Fyndiq.se entry, and click the Configuration
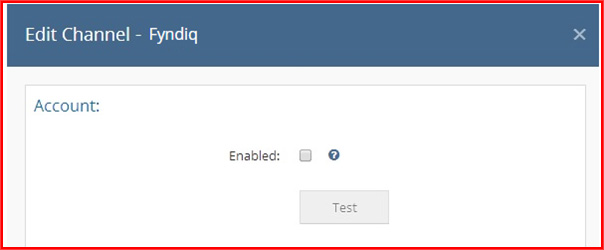
- To Enable or Disable the Account, locate the Account section.
- If the Enabled option is unticked, the channel will not download or update orders, or provide inventory level updates.
- The Test button allows you to confirm there are no errors preventing Linnworks and Fyndiq communicating. Contact EBG Support if Test Reports any errors.
- Click Save at the bottom of this window to apply any changes.
Channel Inventory Settings
- In Linnworks.net, select Settings.
- Select Channel Integration.
- Locate the Fyndiq.se entry, and click Configuration.
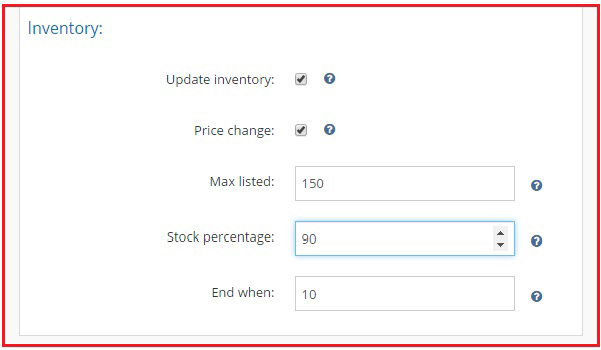
- In the Inventory section, the first entry is Update Inventory. If this is disabled, then Linnworks will not tell the listings on the Fyndiq marketplace when Available Stock Levels change in Linnworks. If enabled, then Linnworks will provide these updates.
- Update Inventory only works where a listing has been Mapped to a Linnworks Inventory item. See the end of this document for more information on Mapping.
- The Price Change feature allows Linnworks to send new prices directly to the listing when they are correctly imported or updated.
- Price Change only works where a listing has been Mapped to a Linnworks Inventory item. See the end of this document for more information on Price Change and Mapping.
- Max Listed allows you to filter the highest quantity that Linnworks can/will send to the listings on this Fyndiq channel. If Max Listed is set to 50, and your Available Stock moves from 30 to 60, Linnworks can only send 50, and this will not change until the Available Stock level drops below 50.
- Stock Percentage acts in a similar fashion, but only updates the listings with the specified percentage of your actual Available Stock level.
- End When allows you to set a ‘false zero’ for the channel. This means it will send Out of Stock notifications when the available stock reaches the value set in this value.
- Click Save at the bottom of this window to apply any changes.
Channel Listing Settings
Linnworks periodically checks the channel for the current listings you have on the channel, their titles and SKUs, so that the Mapping Tool can be used correctly. It can be triggered manually, should you have made changes directly on the channel and outside of Linnworks.
- In Linnworks.net, select Settings.
- Select Channel Integration.
- Locate the Fyndiq.se entry, and click the Configuration button.
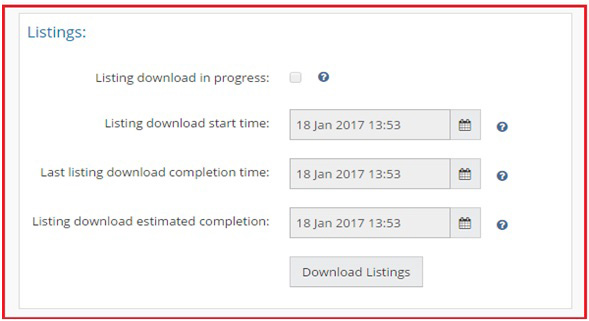
- In the Listings section, the information reflects the information Linnworks currently has about your listed items on the Fyndiq marketplace.
- If there is a tick by Listing Download in Progress, Linnworks is downloading the current listings, and cannot be interrupted.
- The Listing Download Start Time Value is the time the last download/update was started.
- The Last Listing Download Completion time value tells you the last successful download completed and was imported into Linnworks.
- The Listing Download Estimated Completion reflects Linnworks’ best estimate of when the most recent or current download should complete. The Download Listings button instructs Linnworks to retrieve the latest listing information, and ticks the Listing Download in Progress box. This can only be used once every 4 hours maximum, and will warn you if you try to use it more frequently.
- Click Save at the bottom of this window to apply any changes.
Order Settings
This section reflects activities affecting the Linnworks Order Sync on your Fyndiq channel integration. Linnworks downloads orders from Fyndiq with the status Shipping in Progress.
- In Linnworks.net, select Settings.
- Select Channel Integration.
- Locate the Fyndiq.se entry, and click on the Configuration button.
- In the Order section, there are two options.
- Despatch Notes, when enabled, allows Linnworks to send information about orders that have been Processed in Linnworks. Orders that are Processed in Linnworks are updated to the status Shipped on Fyndiq.
- The Order Sync Date reflects the date and time of the last successful order download and update for the current Fyndiq.se channel integration.
- Click Save at the bottom of this window to apply any changes.

API Settings
These settings are used to enable Linnworks and your Fyndiq.se account to connect, and are covered in Step 1.
Click Save at the bottom of this window to apply any changes.

Step 3: Location Mapping

- In Linnworks.net, click Settings.
- Select Channel Integration.
- Locate the Fyndiq.se entry, and click the Configuration button.
- Click the Location Mapping button.
- This opens the Location Mapping window.
- The first option is the Order Download location. This is initially Default, but can be changed. Click on the drop-down list and select which inventory/fulfillment location will initially receive the orders from this Fyndiq integration.
- Under Inventory Sync Locations, you control which Linnworks Inventory locations are used to calculate the Available Stock values for your Fyndiq.se listings.
- If you have only have one location, leave Default enabled.
- If you have multiple Inventory Locations, you can switch off locations that you don’t want to be included in the stock numbers on the listings by sliding the switch to the left.
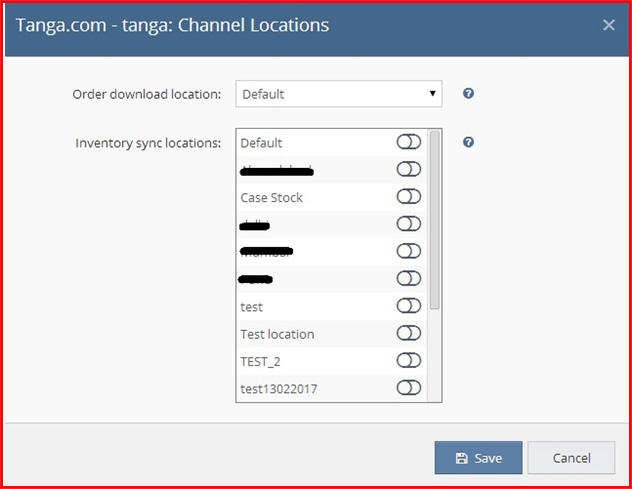
- Click Save when you have finished to update Linnworks. You should also click Save at the bottom of the configuration window to apply any changes.
Step 4: Mapping

Linnworks uses the Mapping Tool to ensure that it knows which SKUs in its inventory are connected to which listings on Fyndiq. As such, you should ensure that all of your listings are mapped correctly, or stock levels and prices will not update correctly, and orders may not be picked accurately.
Mapping
Linnworks.net uses the Mapping Tool to ensure that it knows which SKUs in its inventory are connected to which listings on Fyndiq. As such, you should ensure that all of your listings are mapped correctly, or stock levels and prices will not update correctly, and orders may not be picked accurately.
- In Linnworks.net, click Settings.
- Select Channel Integration.
- Locate the Fyndiq.se entry, and click Mapping (see above).
This screen is divided into two sections.
On the left is the listings Linnworks is aware of on your Fyndiq.se channel. If this is not correct, or a change is missing, you should see the Download Listings button in the Listings section of the Channel Configuration.
On the right is a Linnworks Inventory Search Tool.
Each has its own Search box.
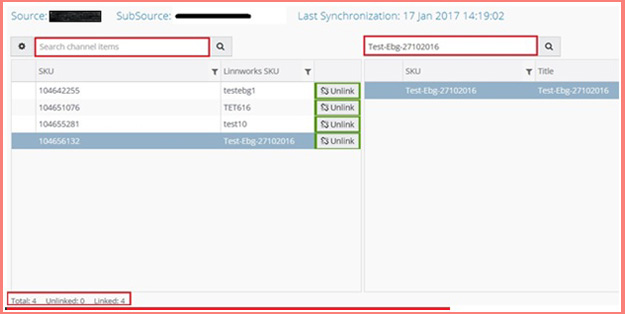
In the bottom left hand corner of the window is a status section. It shows the Total number of listings on the channel, and then beside it the Unlinked and Linked numbers – Linked listings are connected to a Linnworks Inventory item to allow updates and recognition, Unlinked are not. Ideally there should be no Unlinked listings.
Linking Items Automatically
If the SKUs in your inventory match the SKUs used on the listings, you can ask Linnworks to link them all for you.
Click the button in the top left hand corner with a gear on it.
- Select Link all by.
- Select SKU.
- Linnworks will map all those listings that have a SKU which matches a SKU in the Linnworks Inventory.
- Check the Linked and Unlinked values once this is complete.
Linking Items Manually
If the SKUs in your inventory do not match the SKUs used on the listings, you can make the link manually.
- Use the left hand list and Search to find the listing to be linked.
- Click on it to highlight and select it.
- In the right hand list, use the Search box to find the correct Linnworks Inventory item to link it to.
- Click on the Link button beside it with the listing highlighted.
- Repeat for other listings to be linked manually.
Creating Linnworks Inventory Items and Mapping
If there are no SKUs in your inventory matching the SKUs on the listings, you can ask Linnworks to create basic Inventory items for you, and link them.
- Use the left hand list and Search to find the listing to be linked.
- Click on Create button.
- A new item will be created in the Linnworks inventory using the name, price and stock level, as well as the SKU from the listing. This will be linked to the SKU.
- This can be updated with other information later in the Inventory.
- Repeat this for other Listings that have no Linnworks inventory equivalent.
Price Change Functionality
Price Change only works for listings that are correctly linked to a Linnworks Inventory item in the Mapping Tool.
- Open Linnworks.net.
- Select Inventory.
- Select My Inventory.
- Use Search to locate the Inventory item that requires a Price Change on Fyndiq.
- Click on the SKU to edit the item.
- Click on the Listing Descriptions tab.
- Under the Product Pricing by Channel section, click on Add New.
- Enter the Source as Fyndiq.se.
- Enter the SubSource as the name of the Fyndiq.se channel.
- Enter the Price.
- Click on + Add to complete.
- If there is already an entry present for the correct Source and SubSource, double click the Price to edit it, and then press Enter.
- Close the SKU window when you have finished.
Step 5: Payment Mapping

- In Linnworks.net, select Settings.
- Select Channel Integration.
- Locate the Fyndiq.se entry, and click Payment Method (see above).
- This opens the Edit Payment Methods window. The list will initially be blank.
- When mapped, Linnworks will ensure the orders it downloads from Fyndiq.se reflect correctly which payment methods/providers have been used on the site.
- Click Save at the bottom of the channel integration window to apply any changes.
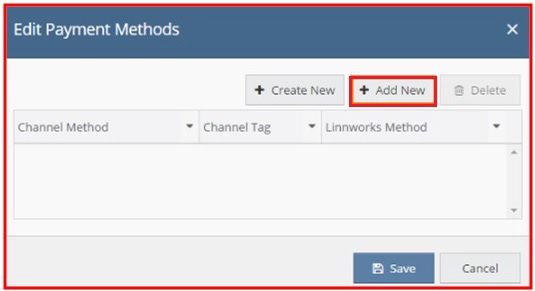
- Map Fyndiq Payment Methods
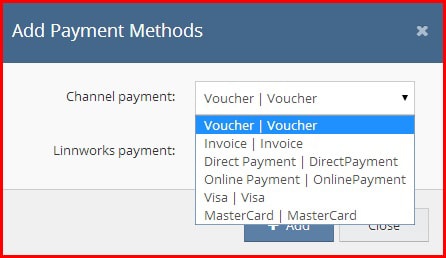
- Select the Channel Payment Method value, and select one of the Payment Methods from Fyndiq that show in the drop-down list.
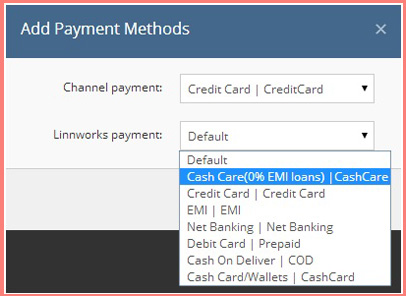
- Click on the Linnworks Payment Method drop-down menu. Select the appropriate Linnworks Payment Method that should be used in Linnworks orders when they are downloaded, including the above payment method.
- Click Add to save the mapping, and return to the list.
- Repeat this for all of the Fyndiq payment methods you require.
- Click Save at the bottom of the channel configuration window to apply any changes.
Step 6: Shipping Mapping

The next step is to map your Fyndiq Shipping services to Postal Services in Linnworks, so orders don’t need to have their Postal Service set manually. Initially, all are mapped to Default.
- In Linnworks.net, select Settings.
- Select Channel Integration.
- Locate the Fyndiq.se entry, and click the Shipping Mapping button (see above).
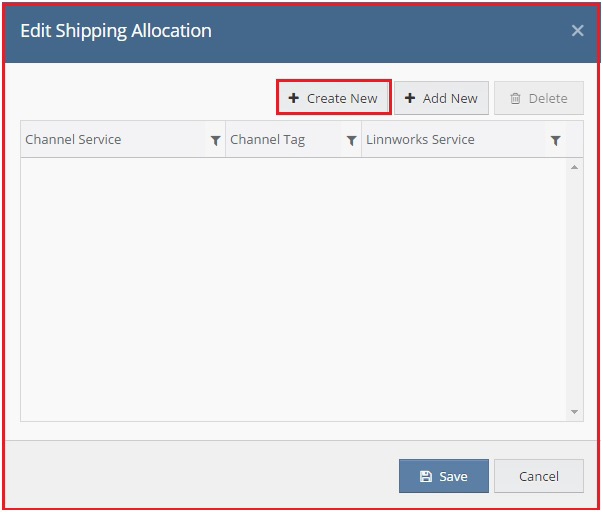
- In the Edit Shipping Allocation window, you should see an empty list.
- To add a new entry for one of your Fyndiq shipping services, click on Create New.
Create New Shipping Service Mapping
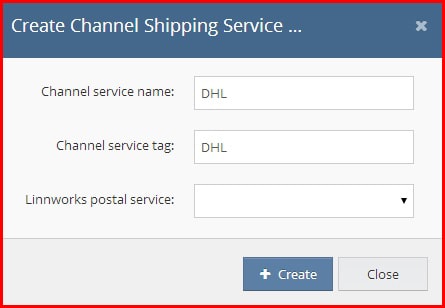
- For Channel Service Name, enter the name of the Shipping Service in Fyndiq.
- In Channel Service Tag, enter the Tag Value used for the service in Fyndiq.
- In the Linnworks Postal Service drop-down, select the name of the Linnworks Postal Service that should be used for orders imported from Fyndiq with the Shipping Service to dispatch them correctly.
- The Add button will save the mapping, and display it in the Edit Shipping Allocation screen.
- Repeat this for all the other Fyndiq shipping methods you require.
- Click Save at the bottom of the channel integration window to apply any changes.
Step 7: Product Listing
Requirements:
Your Fyndiq channel must be integrated in Linnworks.net
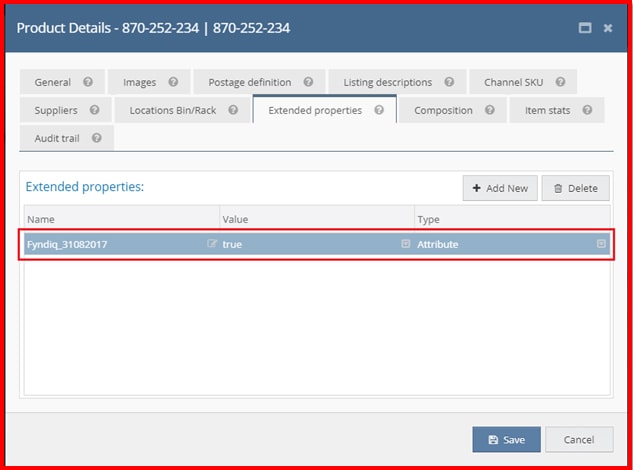
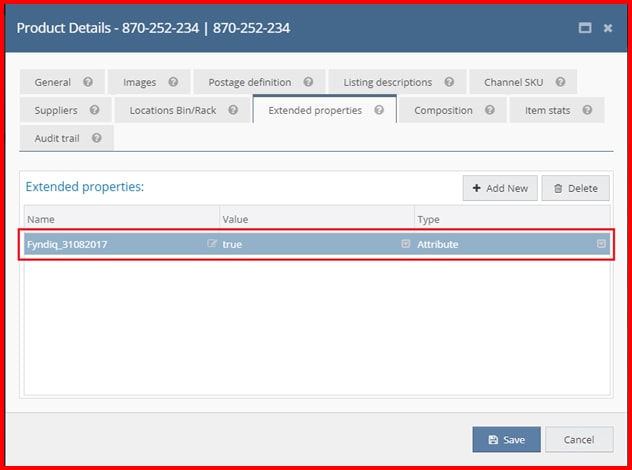
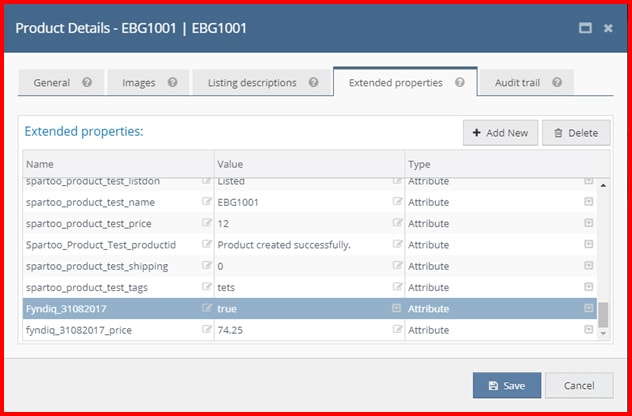
While integrating Fyndiq, Channel Name (Sub source) used must be defined in product’s extended property as below:
- Property Name: Fyndiq_31082017(Name of the Sub Source)
- Property Value: true
- Property Type: Attribute
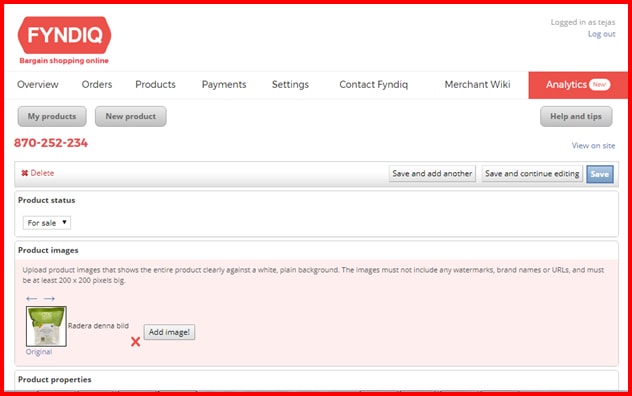
Product must have at least one image inserted in Linnworks.
Stock must be greater than 0.
Price must be greater than 0.
Using The Fyndiq Product Listing Tool:
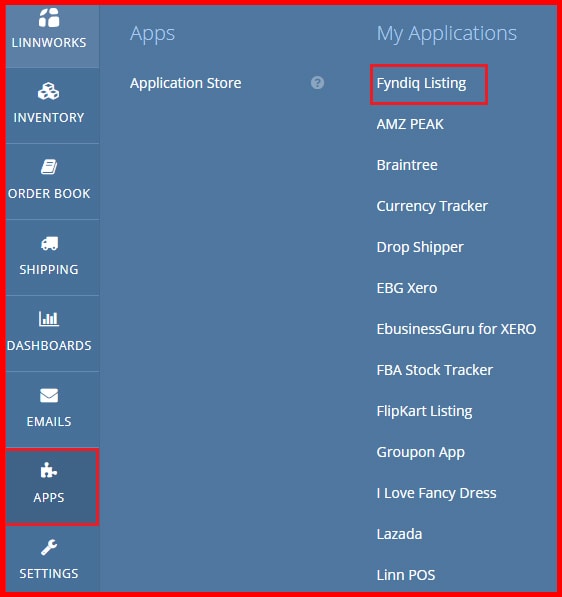
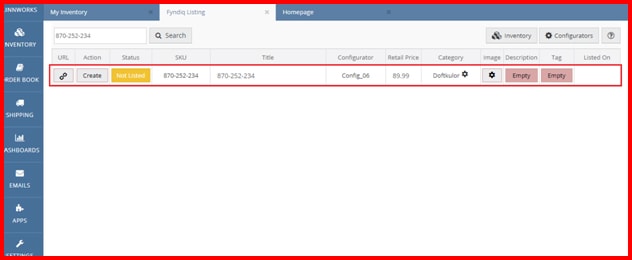
- When your Fyndiq channel is integrated in Linnworks, on the left side of menu screen, the Apps button will appear. Click it to display the available apps, then select Fyndiq Listing.
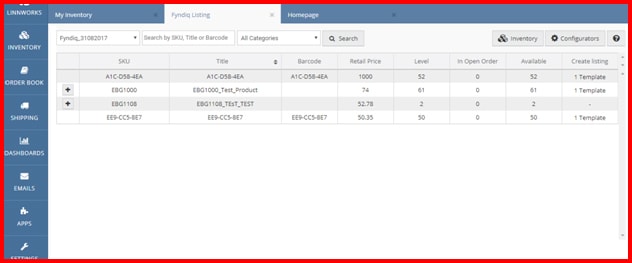
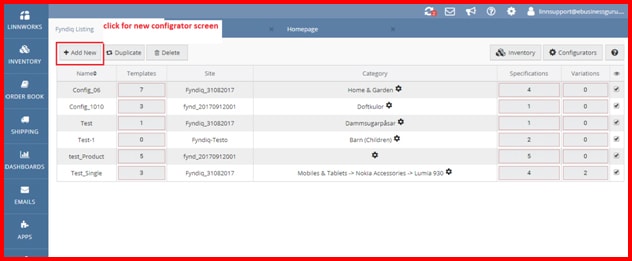
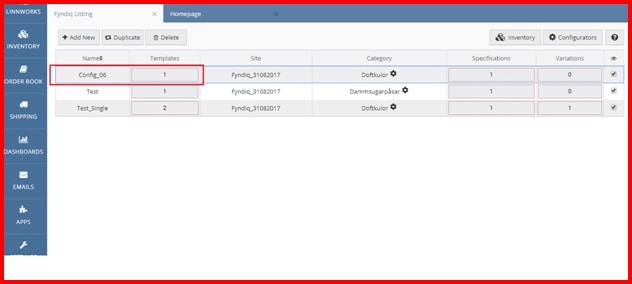
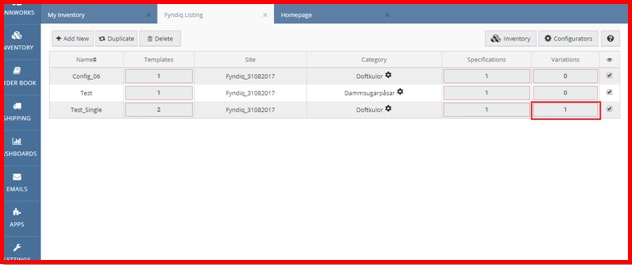
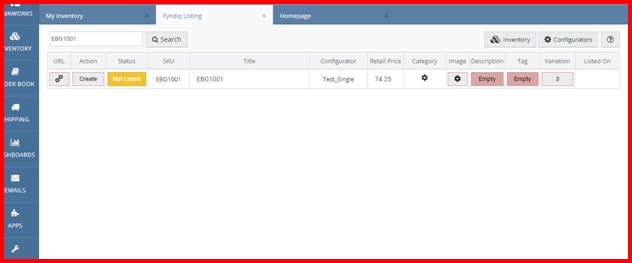
- The main screen will be displayed as below:
- Click Configurations.
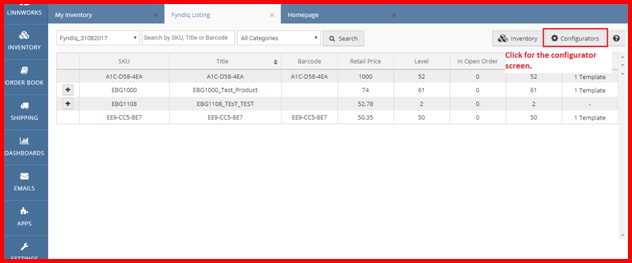
- The main screen displays the following information that can be configured:
- Name: This displays the configurator name that is already created.
- Templates: This displays the count of products already created. Clicking it displays the entire product list.
- Site: This displays the selected site name.
- Category: This displays selected Category. The Category can also be edited here.
- Specification: This displays the count of specifications added. This is used for single product listings, and is not mandatory.
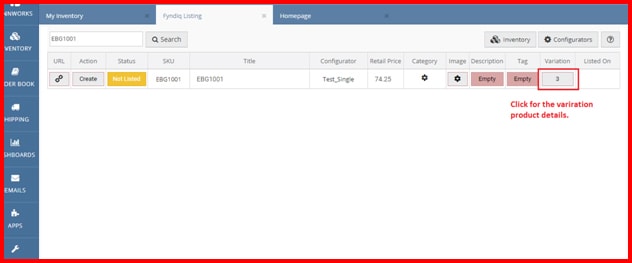
- Variations: This displays the count of variations added. This is use for variation product listings, and is required.
- Show: This checkbox allows you to choose whether to display the listing screen or not. If show checkbox is not ticked, that configurator is not displayed on the product listing page.
- To add a new configuration click Add New.
- Clicking Add Newopens a screen with these details:
- Name: In this field enter the configurator name.
- Site: This dropdown field contains the Fyndiq channel account name (sub source) from Linnworks.

- After filling all the details click Save.
- For single product listings, see the newly created configurator added to the main screen as displayed below.
- For single product listing it isn’t necessary to add a specification.
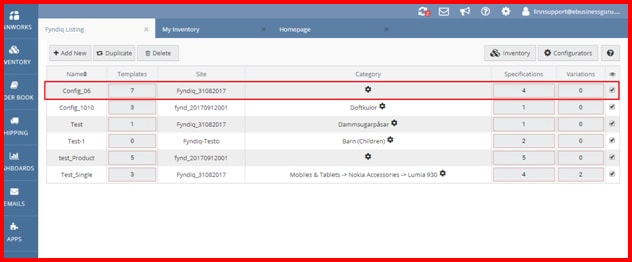
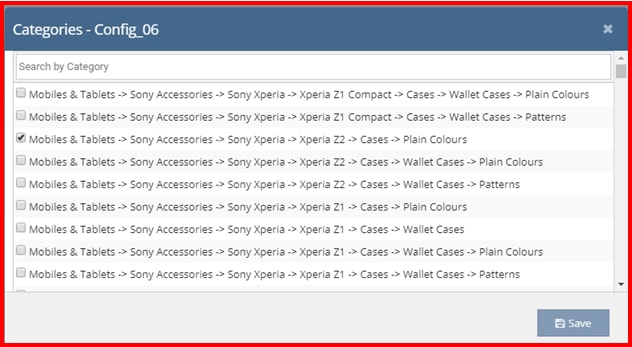
- Now we can add the category for the newly created configurator. To add multiple categories, click on the Cog/Gear Settings button.

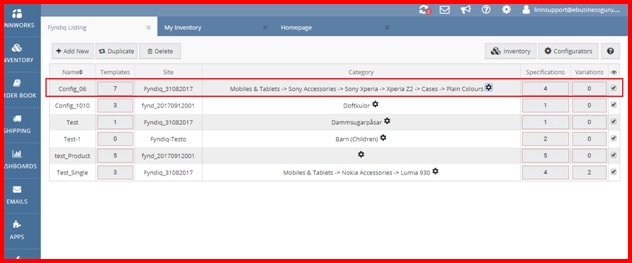
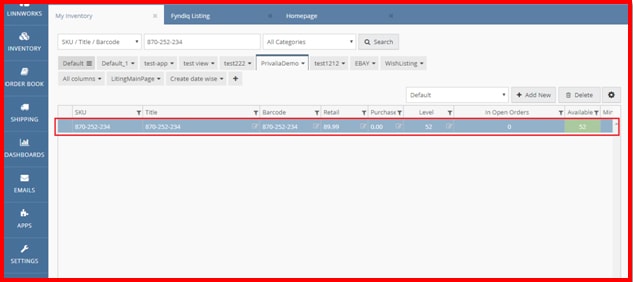
- After creating a configurator, navigate to the Inventory screen.
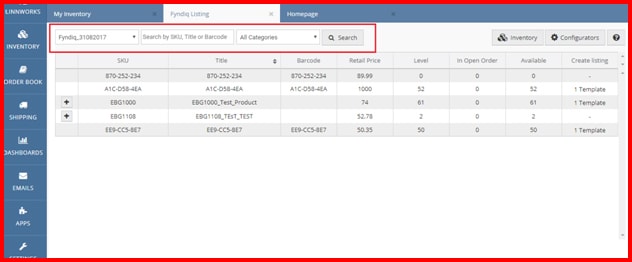
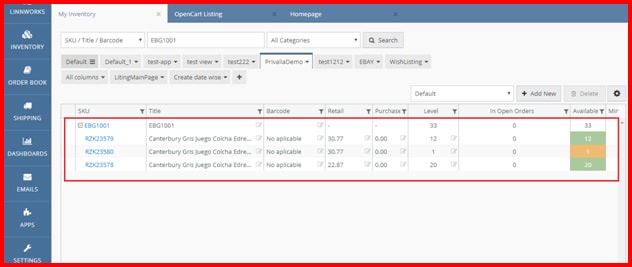
Header menu will display with following column:
- Select Site: This dropdown field contains the Fyndiq channel account name (sub source) from Linnworks. You can select one of them. When you select a site product list, it is displayed as per the site you selected.
- Search: Using this button you can filter your products as per you wish using category, SKU, Title and barcode.
The main screen displays the following column:
- Before SKU column, if you see a blank value, it means the product is single – there is no child product.
If you see  symbol it means the product is a variation product, there is a child product. By clicking on that
  symbol you can see the child product list.
- SKU: This field displayed product name.
- Title: This field displayed product title.
- Barcode: This field displayed product barcode value.
- Retail Price: This field displayed retail price of product.
- Level: This field displayed level of the product of Linnworks.
- In Open Orders: This field displays the count of open orders in Linnworks in which product is associated.
- Available: This field displayed stock of the Linnworks product.
- Create Listing: This field allows the operation of single and variation listings.
 This symbol indicates that, this product is not created in the Fyndiq channel. Product Listing has not been completed.
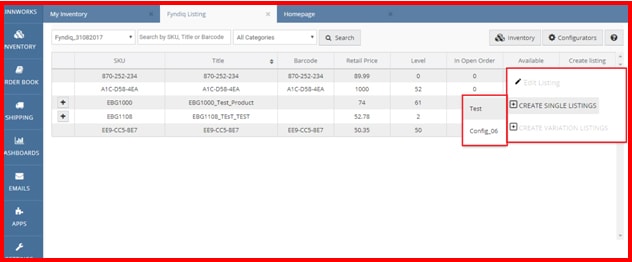
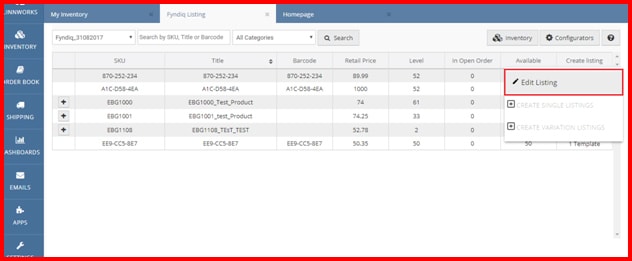
On clicking this field, three options are displayed
- Edit Listing
- Create Single Listing
- Create Variation Listing
If product is single, then you can select the Create Single Listing option. Other options will be disabled. When you click on the Create Single Listing option another list will be displayed; this is list of the configurator.
Select one. After clicking on the configurator, it will redirect to the Single Listing page.
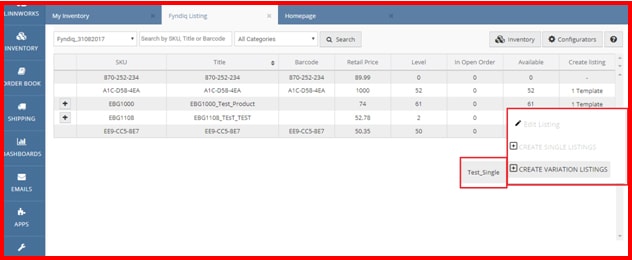
On clicking this field, three options are displayed
- Edit Listing
- Create Single Listing
- Create Variation Listing
If product is Variation, then select Create Variation Listing option. Other options will be disabled. If you click on the Create Variation Listing option another list will be displayed; this is list of the configurator.
Select one. After clicking on the configurator it will redirect to the Variation Listing page.
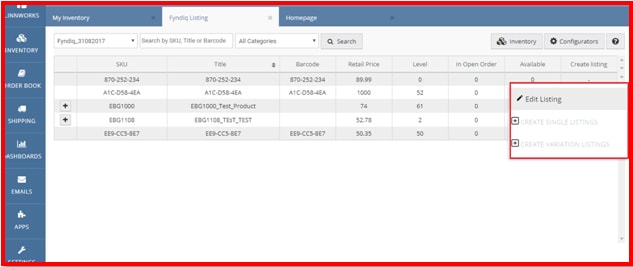
 This symbol indicates that, this product is created in the Fyndiq channel.
On clicking this field, displayed with three option
- Edit Listing
- Create Single Listing
- Create Variation Listing
You can select Edit Listing option only, other options will be disabled.
- Single Listing:
- On clicking Create Single Listing option, the configurator screen is opened with SKUs that have the extended property as below:
Name: Sub source (In this example Fyndiq_31082017)
Value: true
- If you want to list the Linnworks SKU on Fyndiq store then ensure the compulsory fields to create listing on Fyndiq are completed as below:
- SKU
- Title
- Description
- Retail Price (Price cannot be 0 or negative)
- Tags
- Configurator
- Image
SKU: By default, Linnworks SKU will be used for Fyndiq Listing SKU.
Title: The default Linnworks title will be displayed in Title Text box.
Users can make changes in this title according to their requirements. When listing is completed through this app, next time whatever title has been sent to Fyndiq, the same title will be used.
Note for Title: We advise using the following template to build your product names: Main brand + sub-brand, family or product name + up to 3 key attributes + generic product type. Product Names must be clear and concise and should be descriptive of the product being sold.
Description: For adding or editing the description, click on the button as displayed below.
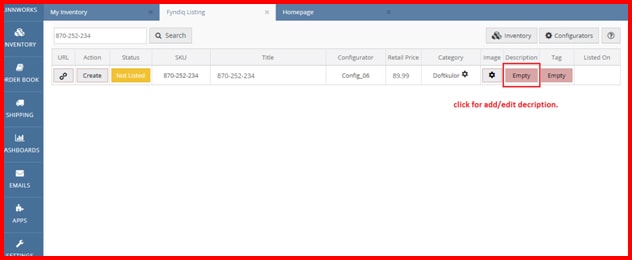
- Complete the detail of description and click Save.
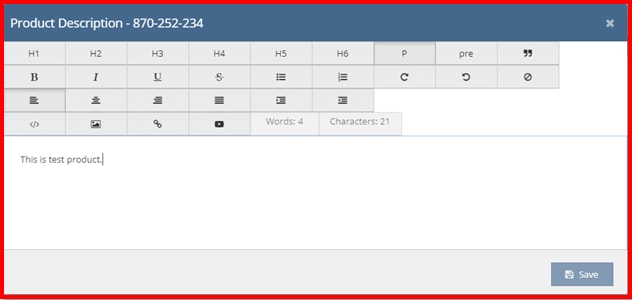
When the app launches for the first time, the Description text box will be empty to allow the user to describe their product on Fyndiq. Once the Description is saved in this screen and listing is done through this app, next time whatever description has been sent to Fyndiq, same description will appear from Linnworks on this screen. After clicking Save, the description that button value will be change from Empty to Filled.
Retail Price:
By default, Linnworks Retail Price will be displayed on this screen.

Tags:
Tags are non-hierarchical keyword or term assigned to each product in your feed. This kind of metadata helps describe an item and allows it to be categorized and found again by browsing or searching on Fyndiq.com. Tags should be comma separated, but do NOT use commas in individual tags. The more tags added, and the more accurate, the better the chances customers will find your products. A maximum of 10 tags are allowed per product, if you add more than 10 the additional tags are ignored.
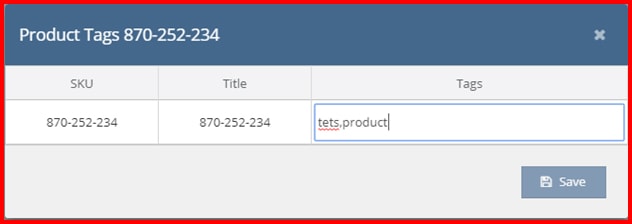
Pop-up screen with text box for adding tags will be opened. User can add maximum 10 tags with comma separated values.
Once all tags are added, click on Save.
Configurator:
In this field configurator name is set as selected which is you selected for the listing operation. This drop-down is disabled; the configurator value cannot be changed here.
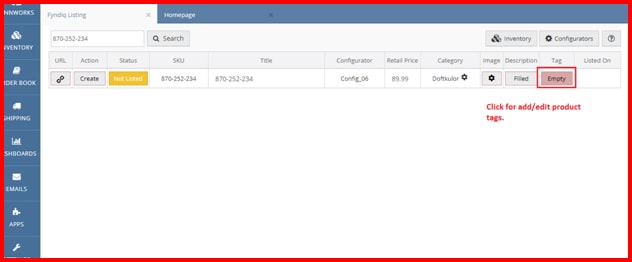
Create Listing:
If listing is not completed, the status column colour will be yellow and status will be Not Listed
Once Title, price, description and tags have been added / updated, click Create. This will create the listing on Fyndiq.
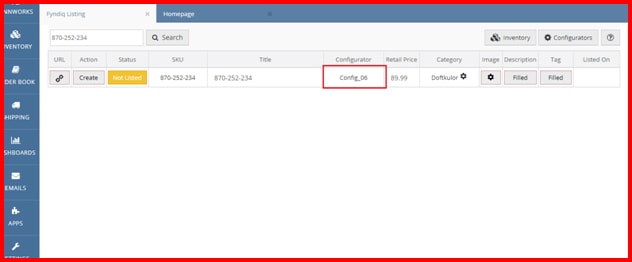
If the listing is successfully created on Fyndiq, status will be changed to Listed and colour will be changed to green.
If the button displays update and checkbox is checked it means this product is enabled in the Fyndiq channel.

Once product is created URL column field value is enabled, you can access it. Clicking on this field it redirect to the Fyndiq channel page and display this product as you created it.
Now you Configurator screen should resemble the screen below. The Templates field is updated with count one because using this configurator we created a single product.
When you click the template field it opens with the following details:
- SKU: Product SKU name created for Fyndiq using this configurator.
- Name: Product title.
- Listed On: Displays the date the product was created.

- Variation Listing:
For Variation item listing, as above, users need to add
Name: Sub source (In this example Fyndiq_31082017)
Value: True
Linnworks parent product
On the Variation Listing screen, only parent products with the extended property as Sub Source: true will be displayed.
Add extended property for parent product price. It is mandatory to add a price in parent product, but it should not created in Fyndiq channel.

- Before starting variation product listing we need to add configurator for it. Configurator screen details will be as above in the single product listing information.
For variation product listing we need to add variations in the added configurator.
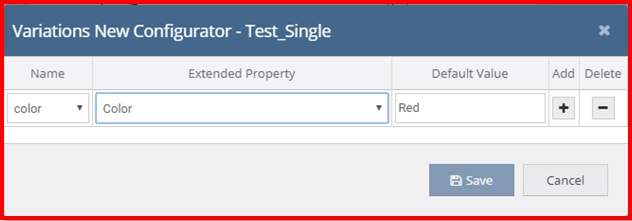
After clicking on variations screen will display with below details:
- Name: This drop-down contains all the list of option from the Fyndiq channel.
- Extended Property: This drop-down contains the entire extended property list from Linnworks.
- Default Value: In this user can add a default value for it.
- Click Save. The configurator screen will be updated with count one.
Using this configurator (Test_Single) we can complete variation product listing.
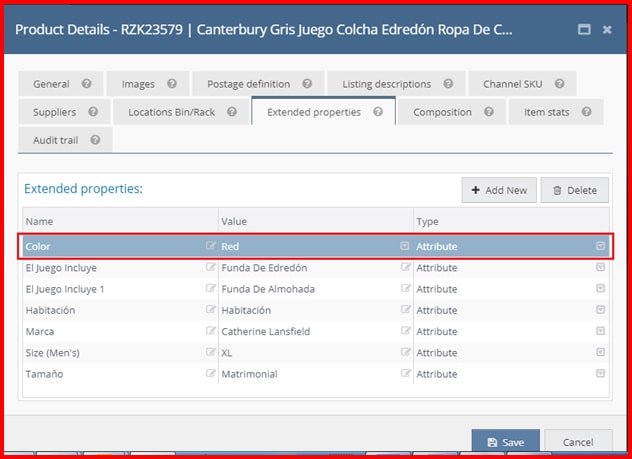
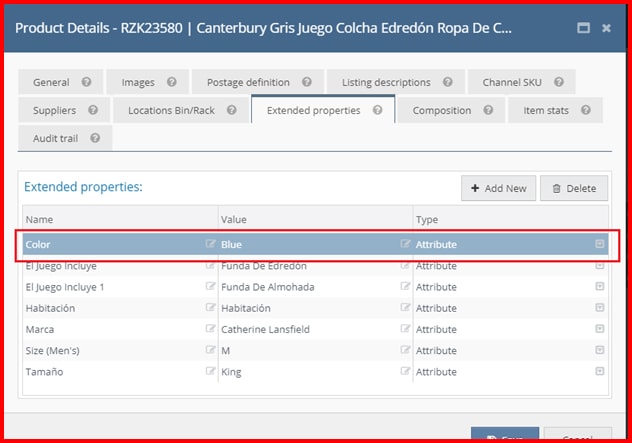
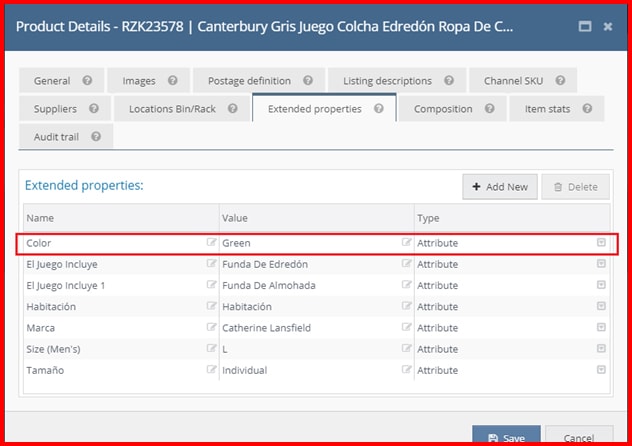
Next, set the extended property value for the entire child product in Linnworks.
For the example here, EBG1001 is a parent product and it has four child products so we have to add hte extended property [Colour] value in all four child values in Linnworks.
Child Products:
- RZK23579
- RZK23578
- RZK23580
After this, we can start variation product listing.
- For Variation Listings:
There are compulsory fields to create listing on Fyndiq as below:
- SKU
- Title
- Description
- Tags
- Configurator
- Variation
- Image
- Price
SKU, Title, Description, Tags and Images are same as described above for single listing.
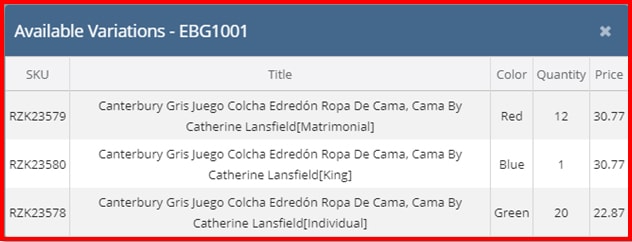
Variations:
The Variation button displays the entire Child products with:
SKU:Child product SKU name is displayed.
Title:Child product title is displayed.
Colour: Child product extended property value is displayed here. We need to add for all child products.
Quantity: This field displays the stock of the child product from Linnworks.
Price: This field displayx the price of child product from Linnworks. And another + value is displayed the plus price in to the parent product price. This value we can also set in extended property. If users do not add the extended property, default value + is displayed.
Once all details are filled, click Create to create listing.
As with single listings, once the listing is created, status will be changed to Listed and button will change to display Update and checkbox is checked.

Once the product is created, the URL column field value is enabled so you can access it. Clicking on this field redirects to the Fyndiq channel page, and displays this product as created.

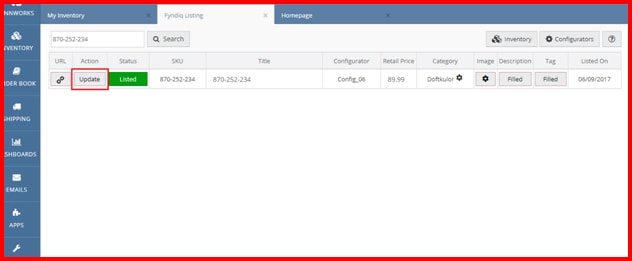
- Edit Listing:
If you want to update title, price, description, category, images and tags on Fyndiq for listings already created, click Edit Listing on the main inventory screen. It will redirect accordingly so you can update the details of that product by clicking Update. This functionality is the same for single product listing and variation product listing.
Document can be accessed by clicking on Documentation as below:
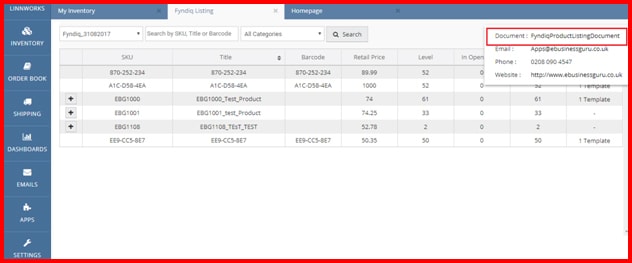
This will be redirected to our documentation URL.
Step 8: FAQs
Basic
| Common Question | Answer |
|---|---|
| What is the channel seller login URL? | https://fyndiq.se/merchant/login |
| What is the URL of the marketplace/channel? | https://fyndiq.se/ |
| Before integration of this channel in Linnworks, should the seller should have an account with fyndiq.se? | Yes, a seller account is required in order to integrate this channel into Linnworks. |
| What functionality is supported by this channel integration? | Management of orders (Download, marks as dispatched), updating prices & updating stock levels. |
| What is the URL of the documentation for this channel integration? | http://www.ebusinessguru.co.uk/fyndiq-linnworks-integration-user-manual/ |
| How do I contact support for help with this channel integration? | You can email your query to [email protected] |
| How do I find the User name , API v1 Token , API v2 Token and Country for setting up the channel integration? | Please refer to documentation: http://www.ebusinessguru.co.uk/fyndiq-linnworks-integration-user-manual/ |
Order
| Common Question | Answer |
|---|---|
| Which type of orders are downloaded into Linnworks? | Only orders with the status of PAID are downloaded into Linnworks from the channel. |
| Which Payment methods are downloaded to Linnworks for orders from the channel? | Only Paid statuses are provided |
| After processing an order in Linnworks, what is the order status changed to on the channel? | The order status is set to Managed. |
| After processing an order in Linnworks, is the tracking information uploaded to the channel order? | Fyndiq supports the following shipping vendors: Postnord, Schenker, DHL, Bring, UPS, DPD, GLS, Hermes, Royal Mail, DSVYou need to define this vendor in Linnworks shipping service. After that you can allocate shipping service to specific order. Once the label is printed, the tracking number is allocated to the order. When the order is processed in Linnworks, order tracking details transfer / are uploaded to Fyndiq and order status changed as Managed at FyndiqNotes: • If above shipping vendors are not defined in Linnworks and orders processed, then order status will not have been changed at Fyndiq • If above shipping vendor not define in Linnworks and order process then tracking number not been uploaded / updated at Fyndiq • You must define this shipping vendor in Linnworks before allocating shipping service & processing any order of Fyndiq |
| Do I have to assign the tracking number to the order before processing it, if I want it uploaded to the channel? | Yes – Orders in Linnworks cannot be edited after processing, and therefore the Tracking number must be in place before the order is processed if you want the channel integration to pass it. |
| Do I need to define the shipping service for the order in Linnworks orders before processing it? | Yes. As orders in Linnworks cannot be updated after the are processed, you must define the Shipping Service before marking the order as processed. |
| Are refunds supported by this Linnworks channel integration? | Refunds are not supported. Any refunds must be executed in Linnworks, and then separately on the Channel. |
| Are order cancellations supported in this Linnworks channel integration? | Order cancellation are not supported. Any orders must be cancelled in Linnworks, and then separately on the Channel. |
| Which types of fulfillments/shipments are supported in this channel integration? | Only standard order shipments are supported to customers by this integration. |
| How often does an integrated channel import orders into Linnworks? | Synchronisation occurs once per hour. |
| How often does an integrated channel send Shipping/Status updates to Fyndiq? | Synchronisation occurs once per hour. |
Price Update
| Common Question | Answer |
|---|---|
| Does this channel integration support price updates for linked listings on the channel? | Yes |
| How often does an integrated channel send price updates to the channel? | Synchronisation occurs once every hour. |
| If we want to change the price in Linnworks, and have the update synchronized by the channel integration, where should we make the update? | In Linnworks.net, select the Inventory tab, and the My Inventory option. Using the tools, search for the item to update. Right click it, and select Edit Product Details Select the Listing Descriptions tab. If the Source and SubSource is already present under Product Pricing by Channel, then click on thePrice to edit it. If the Source and SubSource are missing, click on Add New, next to the Product Pricing by Channel section. Enter the correct Source and Subsource for the Channel Integration. Enter the correct price to be used, |
| Do we need to adjust any settings in the Channel Configurationto use Price Update? | Yes. Open Settings. Open Channel Integration. Click on the Edit Channel Details button. Check the Price Update option. Select Save to finish. |
| If a price is changed on the channel, do we have a track record in Linnworks? | Yes, this will show up in the Audit Trail. |
| If there is a problem with a price update on the channel integration, can Errors be checked inLinnworks? | Yes. In Linnworks.net, select Settings, and then Automation Log. |
Stock Update
| Common Question | Answer |
|---|---|
| Does this channel integration support stock level updates to linked listings on the channel from Linnworks? | Yes, it can automatically update the Available Stock Level on listings via the Channel Integration. |
| How often does the integrated channel update stock levels from Linnworks to the channel? | Synchronisation occurs once per hour. |
| Is there a limitation on which Linnworks stock locations are available for this channel integration?? | Stock can be synchronized to the channel form any location or combination of locations in the Linnworks inventory. |
| Are there any settings we need to change in the channel configuration in Linnworks for Stock Updates to be enabled and active? | Under Settings, Channel Integrations, you should ensure Inventory Sync is enabled. You can select which Linnworks locations will be used to calculate Available Stock. This can be found under Edit Channel Location Mapping. Enable the locations holding stock that are available for that channel. For more information refer to http://www.ebusinessguru.co.uk/fyndiq-linnworks-integration-user-manual/ |
| Can we define a minimum stock level in the selected Channel from the channel integration in Linnworks? | Yes, you can define a minimum level that will signal sending 0 to a listing early. |
| After stock levels are changed on the channel listing, do we have any record in Linnworks ? | Yes, this is recorded in Linnworks. |
| If there is a problem with a stock update from this channel integration, can we check for errors in Linnworks? | Yes, the Automation Logs can be found under Settings in Linnworks. |