MailChimp provide powerful marketing & email automation tools to reach more customers and grow businesses. With MailChimp for Linnworks, you can import customer names and email addresses from Linnworks into your MailChimp mailing list automatically as your orders are processed.
How to Integrate your MailChimp account with Linnworks :
How to Use the MailChimp Application for Linnworks:
MailChimp
Millions of businesses around the world rely on MailChimp’s powerful marketing automation tools to reach more customers and increase their business.
MailChimp for Linnworks is designed to enhance your list generation by automatically importing the email addresses and customer names from your Linnworks orders to your contacts in MailChimp, ensuring you have an up to date mailing list every time you start a new campaign.
Packages available for the MailChimp application for Linnworks
| Number of Contacts Imported | Cost (£) (excluding VAT) |
| 500 | 1 |
| 5000 | 10 |
| 20000 | 25 |
| 50000 | 90 |
| 100000 | 180 |
Introduction:
MailChimp for Linnworks is embedded into Linnworks, and developed and supported by eBusiness Guru.
MailChimp for Linnworks exports data on processed orders from Linnworks (source, subsource, customer name & email address) and exports it to a MailChimp group.
How to install MailChimp for Linnworks:
To use MailChimp for Linnworks, you must first install it from within Linnworks.net
- Login to Linnworks.net
- Select Settings in the left-hand menu bar
- Click on Application Store option (Screen1) it will open applications list page.
- From list user can see “Mailchimp” application (Screen2)
- Click on Install, to add Mailchimp app.
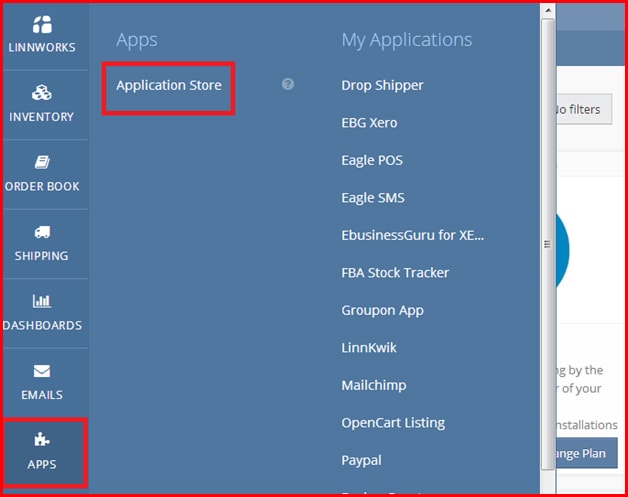
Screen1: Application Store link
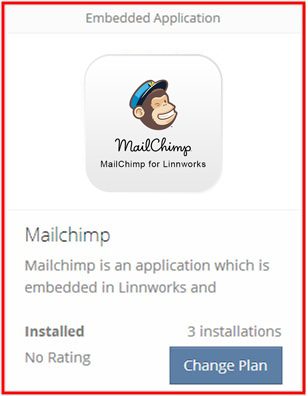
Screen2: MailChimp app into list
How to open MailChimp for Linnworks:
- Log into Linnworks.
- In the left menu, click on Apps.
- When Apps and My Applications opens, under My Applications click on MailChimp (Screen 3)
- The Registration page will open. Ensure you check the box for terms and conditions, then click Register. (Screen 4)
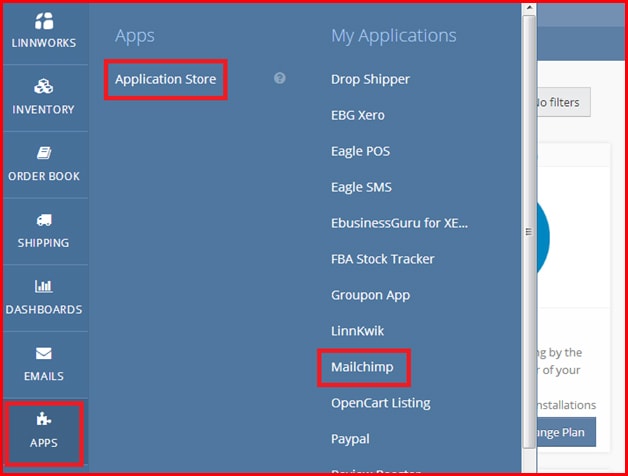
Screen 3: MailChimp link
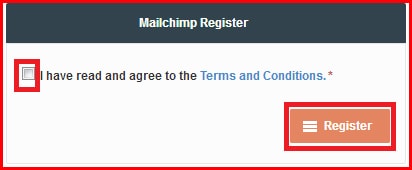
Screen 4: Registration
- Configuration Wizard Screens:
- Once registered, users will see the following options in the wizard:
1) MailChimp Setting (Screen 5)
Set the MailChimp API key. After entering the API key, click on Save to save the key. Click Next to go to step 2 (Screen 10)
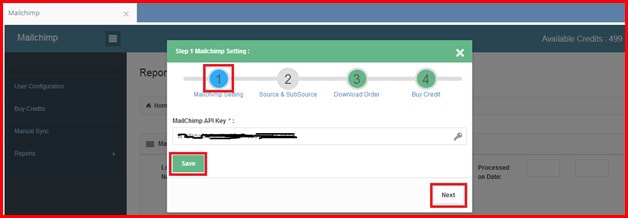
Screen 5: MailChimp Setting
To obtain a MailChimp API key, open this link (Screen 6)
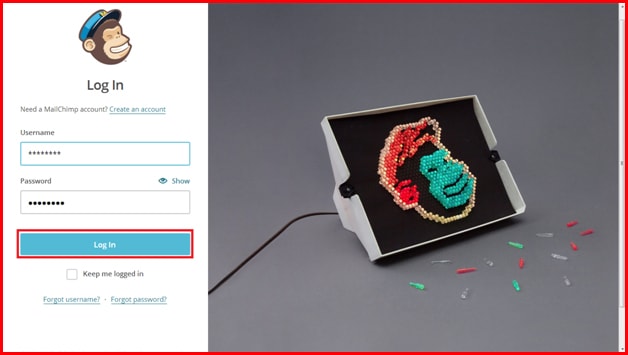
Screen 6: MailChimp website login
Enter username and password and click the Log In button. On successful login, the home screen will open.
On the home screen, click on the profile down arrow (on the right at the top of the screen). It will open a drop-down menu with Account link. (Screen 7)
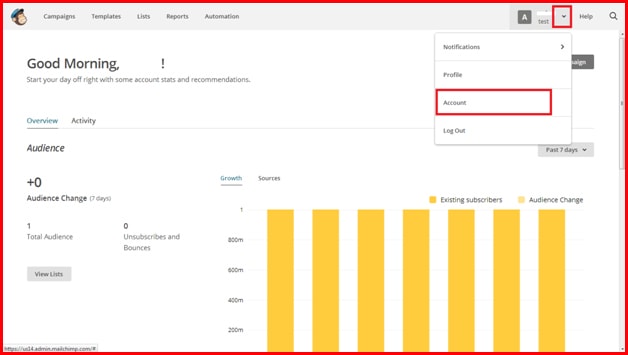
Screen7: MailChimp website home screen
Click on Account link to open the page. Click on the Extra menu to open the drop-down menu (Screen 8)
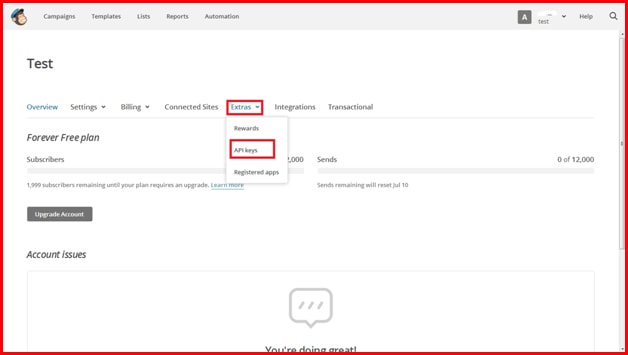
Screen 8: MailChimp website API key menu page
Click on API Keys (as shown in Screen 8) to open the API Key page (Screen 9)
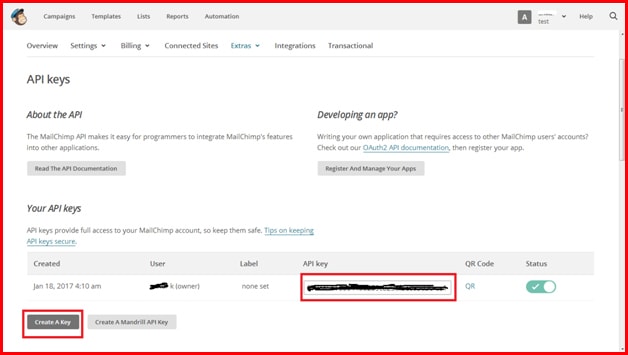
Screen 9: API Key page
Users can obtain their API key by clicking on “Generate A Key” button. Copy API key and paste into MailChimp Settings (Screen 5)
2) Do Not Send the Mail to these Sources & Sub Sources (Screen10)
Here users can select sources/sub sources from the left side listbox and move to right side listbox to exclude data from their MailChimp account. Click on Save to save setting, then click Next to go to Step 3 (Screen11)
If the order source = direct, then orders are automatically sent to MailChimp
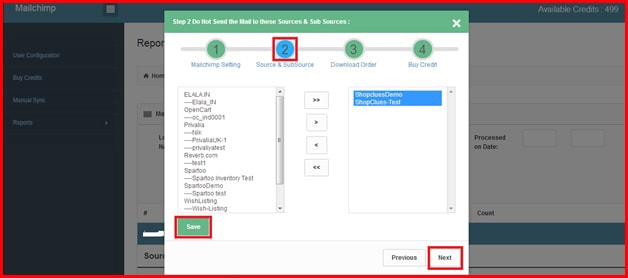
Screen10: Sources/Sub sources Settings
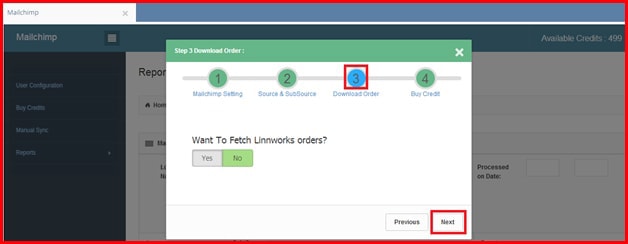
3) Download Orders: (Screen 11)
Here users can set the flag for starting system to download Linnworks process orders.
Click Yes to start the system download.
Click Save and Next to go to Step 4 (Screen12)
Screen11: Download Order
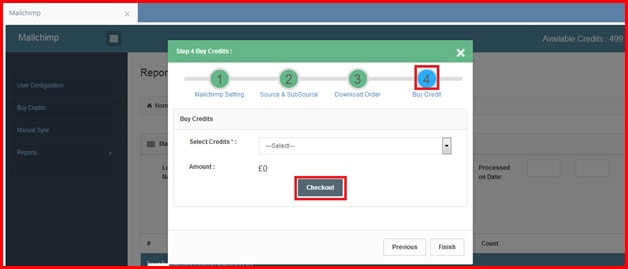
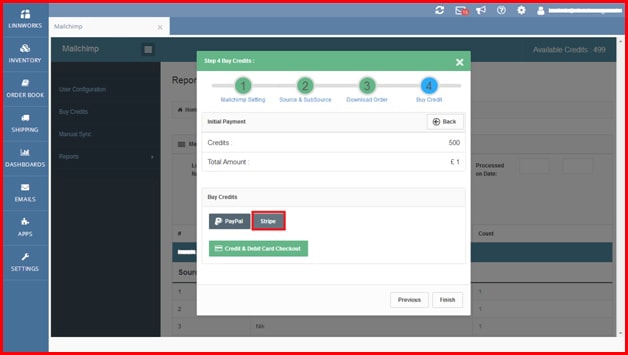
4) Buy Credits: (Screen 12)
Here users can purchase credits to send data to MailChimp. Users can purchase credits using Paypal or Stripe payment gateway.
Screen 12: Buy Credits
User has to select credits from dropdown and according to selection system will display the amount to be paid.
After selecting the required credits, click the Checkout button to display the Payment Gateway Selection (see below)
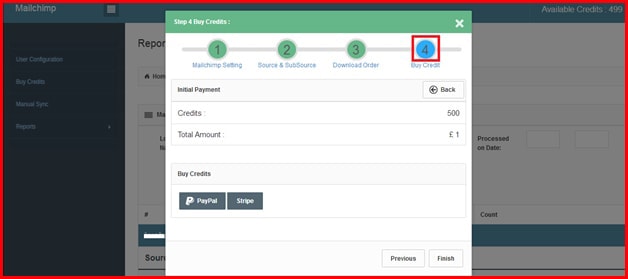
Screen13: Payment Gateway Selection
Click on Paypal, system will display the page below. (Screen14)
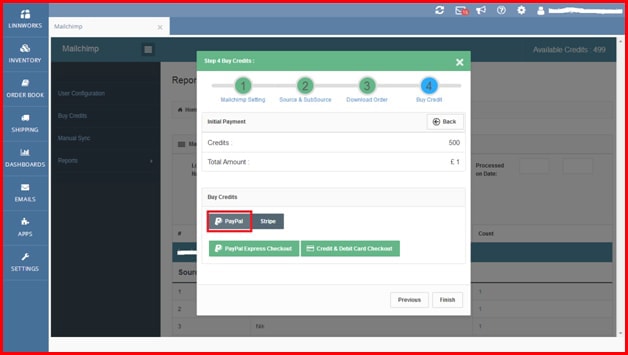
Screen14: Paypal Method Selection
Click on Paypal Express Checkout to open page below (Screen15)
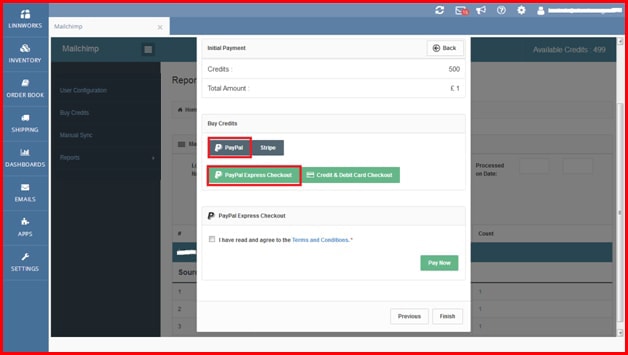
Screen15: Paypal Express Checkout Selection
Tick the box next to the terms and conditions, then click Pay Now. The system will add credits when the payment has completed.
Click on Credit & Debit Card Checkout button, it will display the page below (Screen16). Complete the required fieldds, then click Pay Now. The system will add credits into the user’s account on successful payment.

Screen16: Credit/Debit Card Page
Click on Stripe button to display the page below (Screen17)
Screen17: Stripe Selection
Click on Credit & Debit Card Checkout button to display the below page (Screen18)
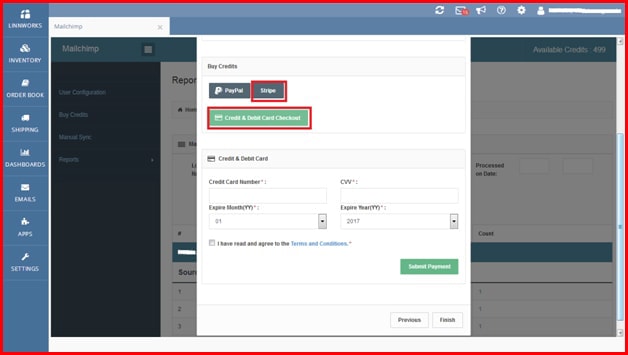
Screen18: Stripe Selection
Here users can complete the required information, then click on Stripe Payment. The system will add credits into user account on successful payment.
5) After completing all the 4 steps, system will open the MailChimp Group Summary Report (Screen19)
MailChimp Group Summary Report:
Click on MailChimp Group summary to display the page below (Screen19)
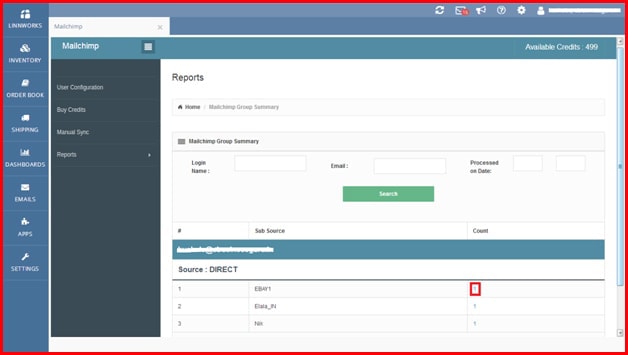
Screen19: MailChimp Group Summary
As per the page above, MailChimp for Linnworks will display a summary of how many orders data (Source/ Sub source, customer name, email) has been sent to MailChimp. (as highlighted with a red square on the screen above).
Click on the number to display the page below. (Screen20) MailChimp for Linnworks will display the status of each orders data – whether it has been updated in the MailChimp account or not. If updated then it will display MailChimp updated, with the date and time.
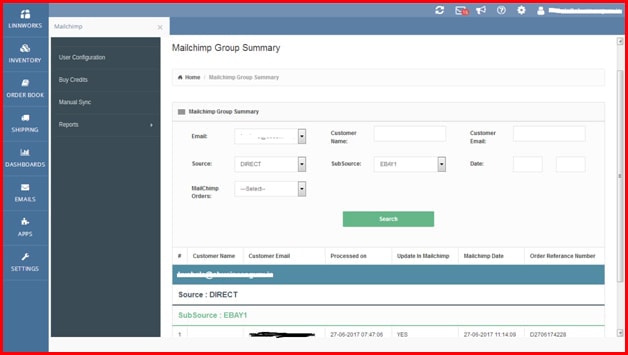
Screen20: MailChimp sending data details
Buy Credits :
4) Buy Credits: (Screen 12)
Here users can purchase credits to send data to MailChimp. Users can purchase credits using Paypal or Stripe payment gateway.
Screen 12: Buy Credits
User has to select credits from dropdown and according to selection system will display the amount to be paid.
After selecting the required credits, click the Checkout button to display the Payment Gateway Selection (see below)
Screen13: Payment Gateway Selection
Click on Paypal, system will display the page below. (Screen14)
Screen14: Paypal Method Selection
Click on Paypal Express Checkout to open page below (Screen15)
Screen15: Paypal Express Checkout Selection
Tick the box next to the terms and conditions, then click Pay Now. The system will add credits when the payment has completed.
Click on Credit & Debit Card Checkout button, it will display the page below (Screen16). Complete the required fieldds, then click Pay Now. The system will add credits into the user’s account on successful payment.
Screen16: Credit/Debit Card Page
Click on Stripe button to display the page below (Screen17)
Screen17: Stripe Selection
Click on Credit & Debit Card Checkout button to display the below page (Screen18)
Screen18: Stripe Selection
Here users can complete the required information, then click on Stripe Payment. The system will add credits into user account on successful payment.
5) After completing all the 4 steps, system will open the MailChimp Group Summary Report (Screen19)
FAQs:
1. How far back can I backdate contact/email address imports?
Up to one month
2. Can this application perform any other features apart from extracting customer names and email addresses from Linnworks processed orders and importing them into my mailing list?
Not at the moment. We hope to add more features/functionality soon, but should you have suggestions for features you would like to see, please let us know.