
Reverb is the number 1 marketplace in the world for buying and selling musical instruments, equipment & accessories online. Manage orders, inventory and push prices updates with the Reverb integration for Linnworks.
Reverb integration for linnworks:
Reverb
Reverb Channel Integration for Linnworks
Reverb allows anyone, from large dealers and manufacturers to small shop owners and individuals, to create free listings for musical instruments and other related equipment.
There are no listings or membership fees to pay when selling on Reverb; there’s simply a low 5% sales fee for items sold through the platform. Reverb also offers free listing marketing via Google Shopping, amongst others.
With the Reverb marketplace, you can be up and running with listing and selling in a matter of minutes. Find out more here.
£24.99 + VAT per month
Step 1: Integrate the Channel into Linnworks.net:
The Reverb connector is an application which is embedded into Linnworks, and developed and supported by eBusiness Guru. To use the Reverb connector, it must be installed in Linnworks.
1. Log in to Linnworks.net
2. Select Settings in the left-hand menu bar
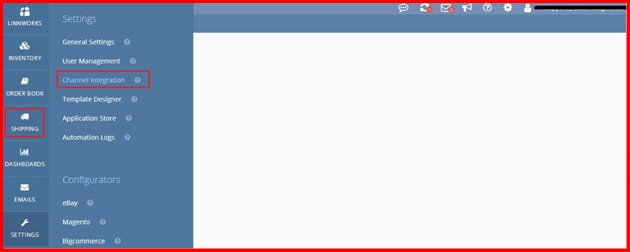
3. Select the Channel Integration option.
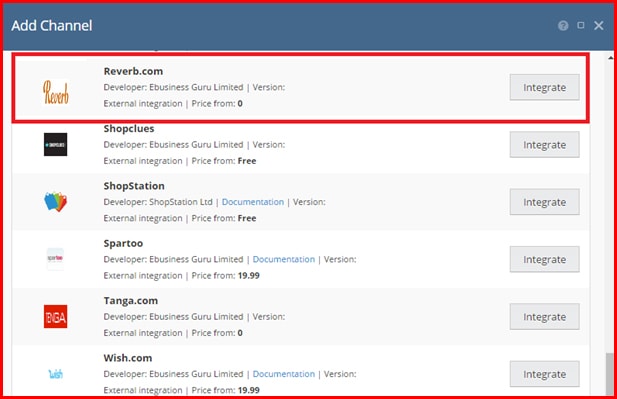
4. Select Add New to return a list of available Channel Integrations.

5. Locate Reverb on the list, and click on Integrate.
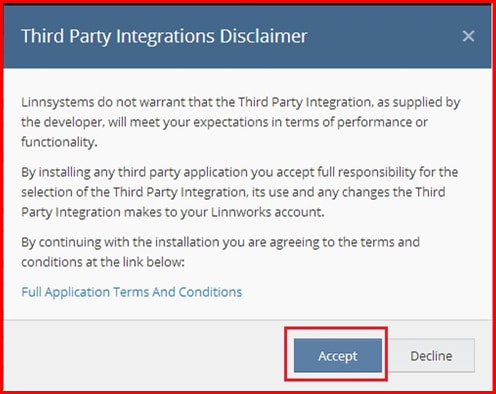
6. After reading the warning, click Accept to move to the next step of the integration. You can click on the link at the bottom to review the connector’s Terms and Conditions first.
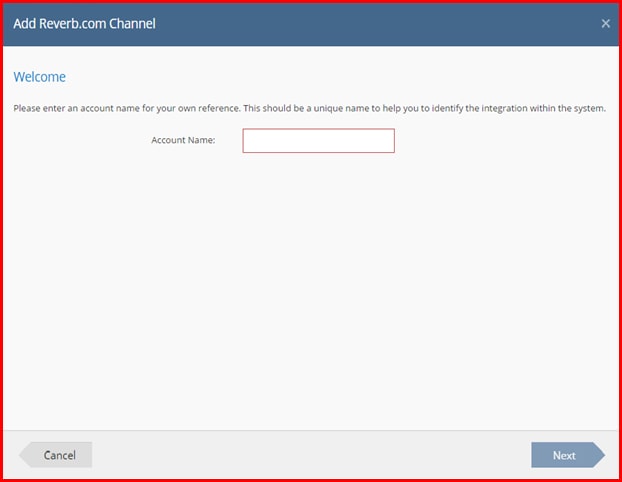
7. Enter your Reverb account name to start the integration.
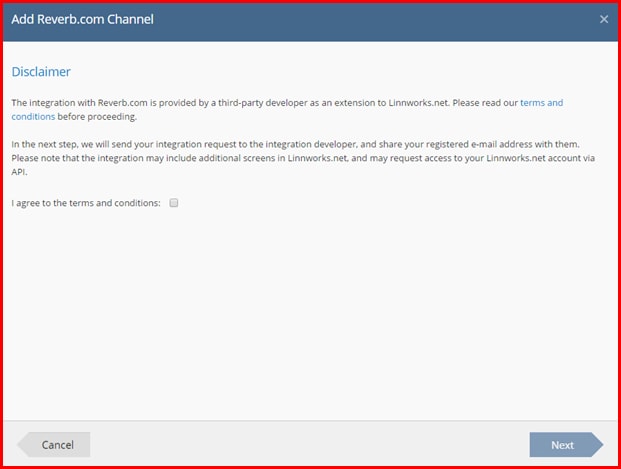
8. After reading the Disclaimer, tick ‘I agree to the terms and conditions’ and click Next to continue the integration.
To integrate your REVERB.COM account, you will need the following information:
A) Personal Access Token:
1.1 Open this link : https://www.reverb.com/my/api_settings
1.2 If you are not already logged in then will be asked for login. Enter your login credentials of your Seller / Merchant Account.
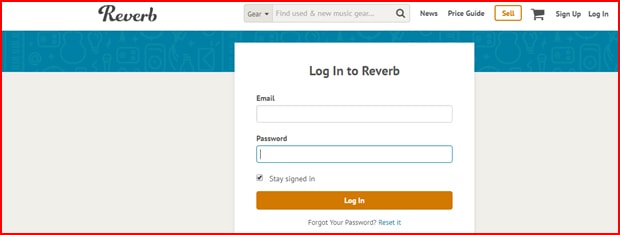
1.3 Click on Login.
1.4 The next page you can see “Personal Access Token”
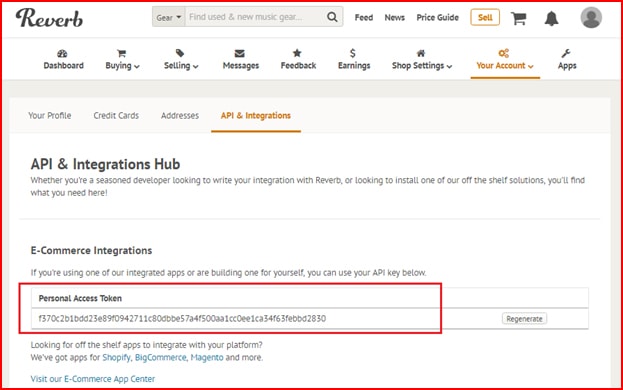
Copy and paste these into the Reverb integration
B) Select Currency = USD
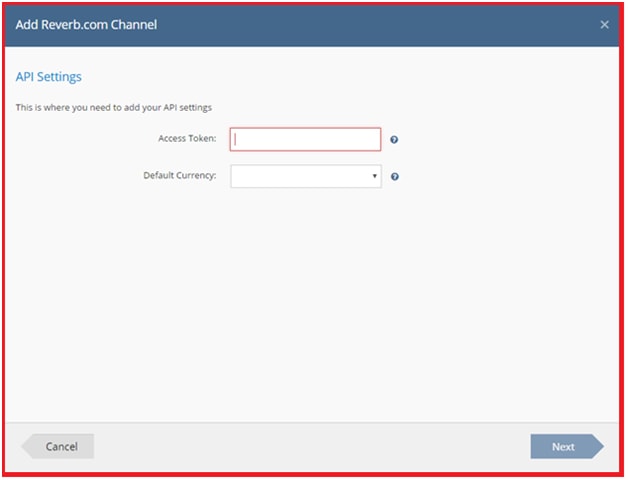
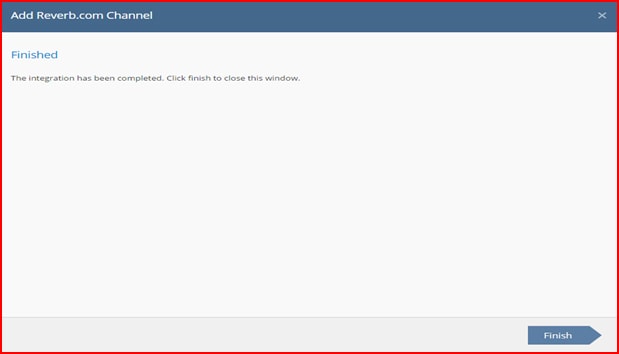
To complete the integration, please click on Finish. Your REVERB.COM integration should now show in Channel Integrations.
Step 2: Edit Channel Details:

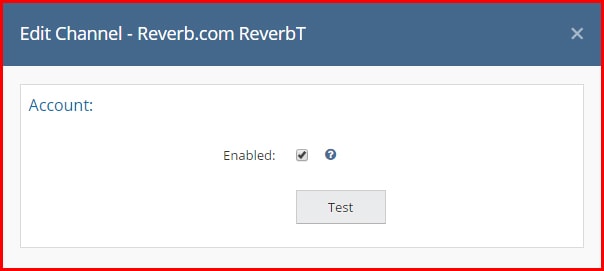
Account Status
1) In Linnworks.net, click Settings.
2) Select Channel Integration.
3) Locate the Reverb entry, and click the Configuration button.
4) To Enable or Disable the Account, locate the Account section.
5) If the Enabled option is unticked, the channel will not download or update orders, or provide inventory level updates.
6) The Test button allows you to confirm there are no errors preventing Linnworks and Reverb communicating. Contact EBG Support if Test Reports any errors.
7) Click Save at the bottom of this window to apply any changes.
Channel Inventory Settings
1) In Linnworks.net, click Settings.
2) Select Channel Integration.
3) Locate the Reverb entry, and click the Configuration button.
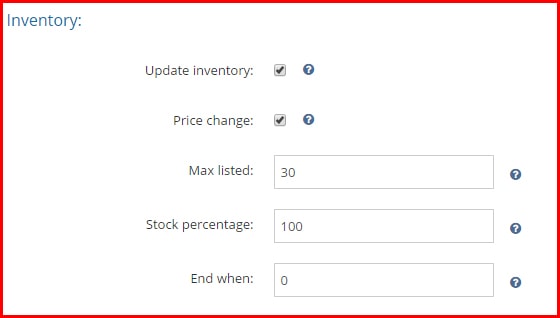
4) In the Inventory section, the first entry is Update Inventory. If this is disabled, then Linnworks will not tell the listings on the Reverb marketplace when Available Stock Levels change in Linnworks. If enabled, then Linnworks will provide these updates.
5) Update Inventory only works where a listing has been Mapped to a Linnworks Inventory item. See the end of this document for more information on Mapping.
6) The Price Change feature allows Linnworks to send new prices directly to the listing when they are correctly imported or updated.
Note that Price Change only works where a listing has been Mapped to a Linnworks Inventory item. See the end of this document for more information on Price Change and Mapping.
7) Max Listed allows you to filter the highest quantity that Linnworks can/will send to the listings on Reverb. If Max Listed is set to 50, and your Available Stock moves from 30 to 60, Linnworks can only send 50, and this will not change until the Available Stock level drops below 50.
8) Stock Percentage acts in a similar fashion, but only updates the listings with the specified percentage of your actual Available Stock level.
9) End When allows you to set a ‘false zero’ for the channel. This means it will send Out of Stock when the available stock reaches the value set in this value.
10) Click Save at the bottom of this window to apply any changes.
Channel Listing Settings
Linnworks.net periodically checks the channel for the current listings you have on the channel, their titles and SKUs, so that the Mapping Tool can be used correctly. It can be triggered manually, should you have made changes directly on the channel and outside of Linnworks.
1) In Linnworks.net, click Settings.
2) Select Channel Integration.
3) Locate the Reverb entry, and click the Configuration button.
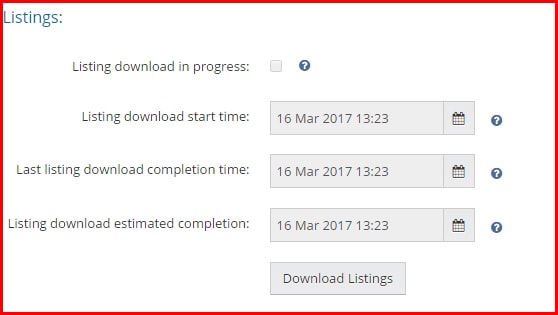
4) In the Listings section, the information reflects the information Linnworks currently has about your listed items on the Reverb marketplace.
5) If there is a tick by Listing Download in Progress, Linnworks is downloading the current listings, and cannot be interrupted.
6) The Listing Download Start Time value is the time the last download/update was started.
7) The Last Listing Download Completion Time value tells you the last successful download completed and was imported into Linnworks.
8) The Listing Download Estimated Completion reflects Linnworks’ best estimate of when the most recent or current download should complete.The Download Listings button instructs Linnworks to retrieve the latest listing information, and ticks the Listing Download in Progress box. This can only be used once every 4 hours maximum, and will warn you if you try to use it more frequently.
9) Click Save at the bottom of this window to apply any changes.
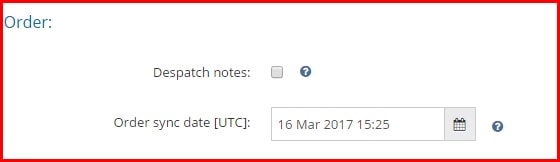
Order Settings
This section reflects activities affecting the Linnworks Order Sync on your Reverb channel integration. Linnworks downloads orders from Reverb with the status Shipping in Progress.
1) In Linnworks.net, click Settings.
2) Select Channel Integration.
3) Locate the Reverb entry, and click the Configuration button.
4) In the Order section, there are two options.
Dispatch Notes, when enabled, allows Linnworks to send information about orders that have been Processed in Linnworks. Orders that are Processed in Linnworks are updated to the status Manifested on Reverb.
The Order Sync Date reflects the date and time of the last successful order download and update for the Reverb channel integration.
5) Click Save at the bottom of this window to apply any changes.
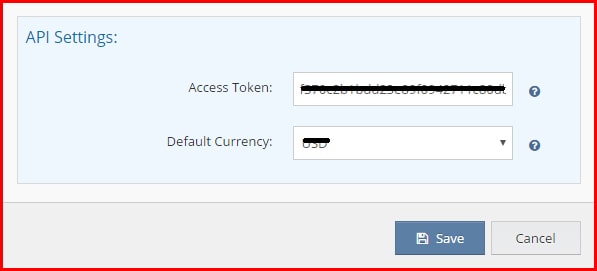
API Settings
These settings are used to enable Linnworks and your Reverb account to connect, and are covered in Step 1. Click Save at the bottom of this window to apply any changes.
Step 3: Location Mapping:

1) In Linnworks.net, click Settings.
2) Select Channel Integration.
3) Locate the Reverb entry, and click the Configuration button.
4) Locate and click the Location Mapping button.
5) In the Location Mapping window, the Order Download options are available. This is initially set as Default, but can be changed. Click on the drop-down list and select which inventory/fulfilment location will initially receive the orders from this Reverb integration.
6) Under Inventory Sync Locations, you control which Linnworks Inventory locations are used to calculate the Available Stock values for your Reverb listings.
8) If you have only a Default location, this can be ignored and you can leave Default enabled.
9) If you have multiple Inventory Locations, you can set locations (Slide switch to the left) that you don’t want to be included in the stock numbers on the listings.
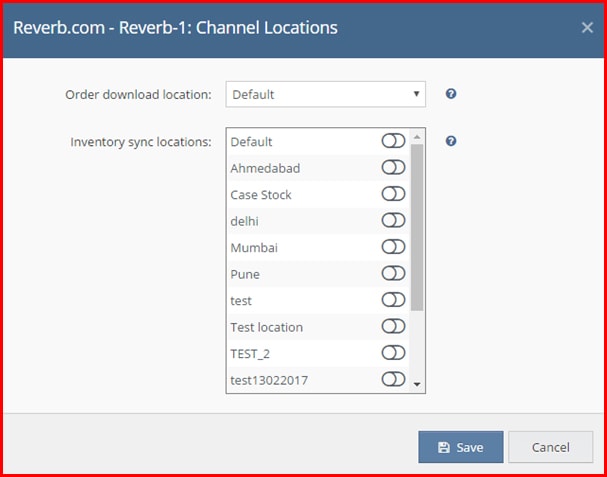
Click Save when you have finished to update Linnworks. You should also click Save at the bottom of the configuration window to apply any changes.
Step 4: Mapping: 
Linnworks.net uses the Mapping Tool to ensure that it knows which SKUs in its inventory are connected to which listings on Reverb. As such, you should ensure that all of your listings are mapped correctly, or stock levels and prices will not update correctly, and orders may not be picked accurately.
1) In Linnworks.net, click Settings.
2) Select Channel Integration.
3) Locate the Reverb entry, and click the Configuration button.
This screen is divided into two sections. Displayed on the left are the listings Linnworks is aware of on your Reverb channel. If these are not correct, or a change is missing, you should see the Download Listings button in the Listings section of the Channel Configuration. On the right is a Linnworks Inventory Search Tool.
Each has its own Search box.
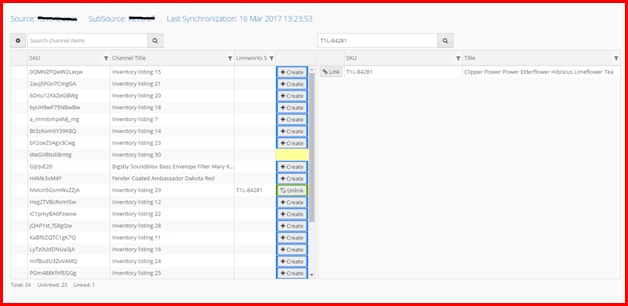
In the bottom left hand corner of the window is a Status section. It shows the Total Number of Listings on the channel, and then beside it the Unlinked and Linked numbers – Linked listings are connected to a Linnworks Inventory item to allow updates and recognition, Unlinked are not. Ideally there should be no Unlinked listings.
Linking Items Automatically
If the SKUs in your inventory match the SKUs used on the listings, you can ask Linnworks to link them all for you.
1) Click the Settings button (in the top left hand corner) with a gear/cog on it.
2) Select Link All By.
3) Select SKU.
4) Linnworks will map all those listings that have a SKU which matches a SKU in the Linnworks Inventory.
5) Check the Linked and Unlinked values once this is complete.
Linking Items Manually
If the SKUs in your inventory do not match the SKUs used on the listings, you can make the link manually.
1) Use the left hand list and Search to find the listing to be linked.
2) Click on the listing to highlight and select it.
3) In the right hand list, use the Search box to find the correct Linnworks Inventory item to link it to.
4) Click on the Link button beside it with the listing highlighted.
5) Repeat for other listings to be linked manually.
Creating Linnworks Inventory items and Mapping
If there are no SKUs in your inventory match to the SKUs on the listings, you can ask Linnworks to create basic Inventory items for you, and link them.
1) Use the left hand list and Search to find the listing to be linked.
2) Click on the Create button.
3) A new item will be created in the Linnworks inventory using the Name, Price and Stock Level, as well as the SKU from the listing. This will be linked to the SKU.
4) This can be updated with other information later in the Inventory.
5) Repeat this for other Listings that have no Linnworks inventory equivalent.
Price Change Functionality
Price Change only works for listings that are correctly linked to a Linnworks Inventory item in the Mapping Tool.
1) Open Linnworks.net.
2) Select Inventory.
3) Select My Inventory.
4) Use Search to locate the Inventory item that requires a Price Change on Reverb.
5) Click on the SKU to edit the item.
6) Click on the Listing Descriptions tab.
7) Under the Product Pricing by Channel section, click on Add New.
8) Enter the Source as Reverb.
9) Enter the Sub Source as the name of the Reverb channel.
10) Enter the Price.
11) Click on + Add to complete.
12) If there is already an entry present for the correct Source and Sub Source, double click the Price to edit it, and then press Enter.
13) Close the SKU window when you have finished.
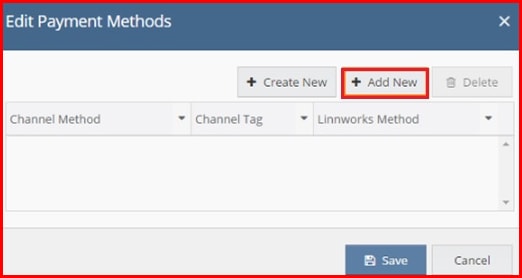
Step 5: Payment Mapping:

1) In Linnworks.net, click Settings.
2) Select Channel Integration.
3) Locate the Reverb entry, and click the Payment Method button.
4) This opens the Edit Payment Methods window. The list will initially be blank.
5) When mapped, Linnworks will ensure the orders it downloads from Reverb reflect correctly which payment methods/providers have been used on the site.
6) Click Save at the bottom of the channel integration window to apply any changes.
Map Reverb Payment Methods

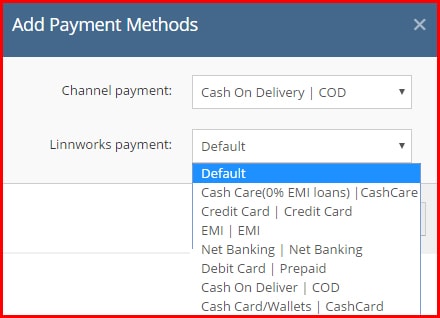
1. Select the Channel Payment Method value, and select one of the Payment Methods from Reverb that show in the drop-down list.
2. Then click on the Linnworks Payment Method drop-down list. Select the appropriate Linnworks Payment Method that should be used in Linnworks orders when they are downloaded, including the above payment method.
3. Click Add to save the mapping and return to the list.
4. Repeat this for all of the Reverb payment methods you wish to use.
5. Click Save at the bottom of the channel configuration window to apply any changes.
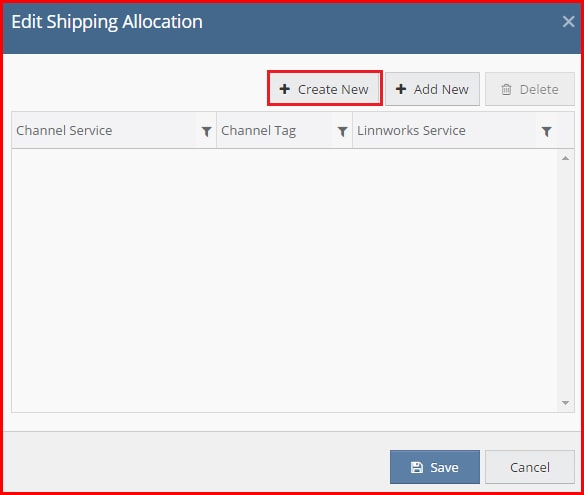
Step 6: Shipping Mapping:

The next step is to map your Reverb Shipping services to Postal Services in Linnworks, so orders don’t need to have their Postal Service set manually. Initially, all are mapped to Default.
1) In Linnworks.net, click Settings.
2) Select Channel Integration.
3) Locate the Reverb entry, and click the Shipping Mapping button (see above).
4) In the Edit Shipping Allocation window, you should see an empty list.
5) To add a new entry for one of your Reverb shipping services, click Create New.
Create New Shipping Service Mapping
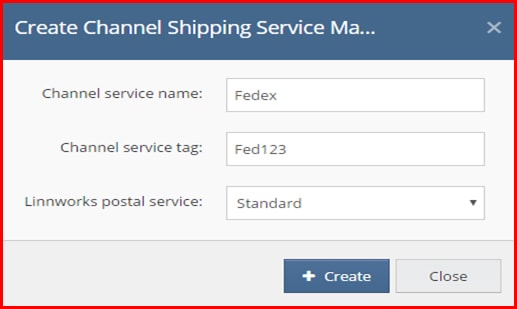
1. For Channel Service Name, enter the name of the Shipping Service in Reverb.
2. In Channel Service Tag, enter the Tag Value used for the service in Reverb.
3. In the Linnworks Postal Service drop-down list, select the name of the Linnworks Postal Service that should be used for orders imported from Reverb with the Shipping Service to dispatch them correctly.
4. Click the Add button to save the mapping, and display it in the Edit Shipping Allocation screen.
5. Repeat this for all the other Reverb Shipping methods you wish to use.
6. Click Save at the bottom of the channel integration window to apply any changes.
Step 7: FAQs:
Basic
| Common Question | Answer |
|---|---|
| What is the channel seller login URL? | https://reverb.com/signin |
| What is the URL of the marketplace/channel? | https://www.reverb.com |
| Before integration of this channel in Linnworks, seller should have an account with Reverb? | Yes, a seller account is required in order to integrate this channel into Linnworks. |
| What functionality is supported by this channel integration? | Management of orders (download, mark as dispatched), Updating Price & Updating Stock |
| What is the URL of the documentation for this channel integration? | http://www.ebusinessguru.co.uk/reverb-Linnworks-integration-user-manual/ |
| How do I contact support for help with this channel integration? | You can email your query to [email protected] |
| How do I find the Website Path and API Key for setting up the channel integration? |
Please refer to step one on the guide on this page. |
Order
| Common Question | Answer |
|---|---|
| Which type of orders are downloaded into Linnworks? | Only orders with the status of Confirmed are downloaded from channel to Linnworks. |
| Which Payment methods are downloaded to Linnworks for orders from the channel? | Only Paid status is provided. |
| After processing an order in Linnworks, what is the order status changed to on the channel? | The order status is set to Manifested. |
| After processing an order in Linnworks, is the tracking information uploaded to the channel order? | Yes if present |
| Do I have to assign the tracking number to the order before processing it, if I want to upload the tracking number to the channel? |
Yes – Orders in Linnworks cannot be edited after processing, and therefore the Tracking number must be in place before the order is processed if you want the channel integration to pass it. |
| Do I need to define the shipping service for the orders in Linnworks before processing it? | Yes. As orders in Linnworks cannot be updated after the orders are processed, you must define the Shipping Service before marking the order as processed. |
| Are refunds supported by this Linnworks channel integration? | Refunds are not supported. Any refunds must be executed in Linnworks, and then separately on the Channel. |
| Are order cancellations supported in this Linnworks channel integration? | Order cancellation are not supported. Any orders must be cancelled in Linnworks, and then separately on the Channel. |
| Which types of fulfillments/shipments are supported in this channel integration? | Only standard order shipments are supported to customers by this integration. |
| How often does an integrated channel import orders into Linnworks? | Synchronisation occurs once per hour. |
| How often does an integrated channel send Shipping/Status updates to Reverb? | Synchronisation occurs once per hour. |
Price Update
| Common Question | Answer |
|---|---|
| Does this channel integration support price updates for linked listings on the channel? | Yes |
| How often does an integrated channel send price updates to the channel? | Synchronisation occurs once every hour. |
| If we want to change the price in Linnworks, and have the update synchronized by the channel integration, where should we make the update? | In Linnworks.net, select the Inventory tab, and the My Inventory option. Using the tools, search for the item to update. Right click it, and select Edit Product Details Select the Listing Descriptions tab. If the Source and SubSource is already present under Product Pricing by Channel, then click on the Price to edit it. If the Source and SubSource are missing, click on Add New, next to the Product Pricing by Channel section. Enter the correct Source and Subsource for the Channel Integration. Enter the correct price to be used. |
| Do we need to adjust any settings in the Channel Configurationto use Price Update? | Yes. Open Settings. Open Channel Integration. Click on the Edit Channel Details button. Check the Price Update option. Select Save to finish. |
| If a price is changed on the channel, can we track this in Linnworks? | Yes, this will show up in the Audit Trail. |
| If there is a problem with a price update on the channel integration, can Errors be checked in Linnworks? | Yes. In Linnworks.net, select Settings, and then Automation Log. |
Stock Update
| Common Question | Answer |
|---|---|
| Does this channel integration support stock level updates to linked listings on the channel from Linnworks? | Yes, it can automatically update the Available Stock Level on listings via the Channel Integration. |
| How often does the integrated channel update stock levels from Linnworks to the channel? | Synchronisation occurs once per hour. |
| Is there a limitation on which Linnworks stock locations are available for this channel integration?? | Stock you can define in any location in Linnworks. |
| Are there any settings we need to change in the channel configuration in Linnworks for Stock Updates to be enabled and active? | Under Settings, Channel Integrations, you should ensure Inventory Sync is enabled. You can select which Linnworks locations will be used to calculate Available Stock. This can be found under edit channel location mapping. Enable the locations holding stock that are available for that channel. For more information refer to http://www.ebusinessguru.co.uk/wish-user-manual/ |
| Can we define a Minimum stock level in the selected Channel from the channel integration in Linnworks? | Yes, you can define a minimum level that will signal sending 0 to a listing early. |
| After stock levels are changed on the channel listing, do we have any record in Linnworks ? | Yes, this is recorded in Linnworks. |
| If there is a problem with a stock update from this channel integration, can we check for errors in Linnworks? | Yes, the Automation Logs can be found under Settings in Linnworks. |