
LinnPOS is an innovative POS system that helps online sellers with a brick & mortar store, to automate the process of order management, stock management & inventory management between their offline shop & Linnworks effortlessly
Available on the Linnworks Applications Store- Packages Available: £50 + VAT/month per license
LinnPOS is a comprehensive solution designed to not only provide a reliable EPOS solution from one site to several, with one or more EPOS terminals. It ties them all together via the cloud, and also can tie them to Linnworks, so your business, and your inventory, are always up to date.
Linnworks sellers with a retail or wholesale shop should consider LinnPOS to help manage the process of order management, stock management, and inventory management between their shop and Linnworks more effectively. After accepting a transaction in store, there’s no need to worry about re-creating the same order again in Linnworks. LinnPOS will push processed orders from the retail store into Linnworks automatically. Once orders are processed, LinnPOS will synchronise with stock levels and so stock adjustments will be made. Users can also create new products for Linnworks using LinnPOS and vice versa, with a touch of a button.
What are the components of this solution?
- The LinnPOS EPOS software tracks sales and stock items, allowing you to serve your customers. (Available upon request)
- The LinnPOS Cloud-based management platform connects to your LinnPOS EPOS terminals to ensure they’re all using the latest prices and Inventories. It also gives a management interface for you to manage the orders across all of your tills and locations. (Available within LinnPOS software suite)
- The LinnPOS Connector allows LinnPOS to connect to your Linnworks account. This means all your sales from EPOS are synchronised to Linnworks, updating available stock. All items created in your Linnworks Inventory are available in EPOS, and vice versa.
- Linnworks – You need a Linnworks Account to use the Adaptor. Linnworks connects to your websites and marketplaces, importing their orders for dispatch so that all of your reporting includes all of your sales. It also manages your available stock, so your store sales affect online availability to maximise availability and minimise wastage and over-stocking.
Where do I start?
You can start with just one compatible EPOS terminal (till) –you can purchase from us or if you have your own compatible Windows till hardware or PC (currently not compatible with MAC), you can just sign up for the software! (You can contact us to confirm compatibility). Once you have more than one EPOS terminal, whether on the same retail/wholesale site, or on different sites, then the Cloud Management System is needed to manage and co-ordinate them.
And with the LinnPOS Connector, you can connect one, or two, or as many as you need of the LinnPOS EPOS terminals to Linnworks.
The LinnPOS Connector
The LinnPOS Connector is an application which connects Linnworks.net with eBusiness Guru’s Point-Of-Sale software solution, providing you with complete control of stock and orders from your Retail or Wholesale shop alongside your eCommerce channels. If you are already running eBusiness Guru’s EPOS software in a brick and mortar, you just need the connector to get your store online and talking to Linnworks.
The LinnPOS Connector lets you:
- Sync orders From LinnPOS to Linnworks once paid for and completed in store
- Map the products in LinnPOS with your Linnworks products
- See products created in LinnPOS also in Linnworks
- See products created inLinnworks also in LinnPOS
- Stock levels updated in sync between LinnPOS and Linnworks
- Consistent reporting for orders, product updates, and products creation
Step 1:Installation Process
To install LinnPOS, you must first install it from within Linnworks.net
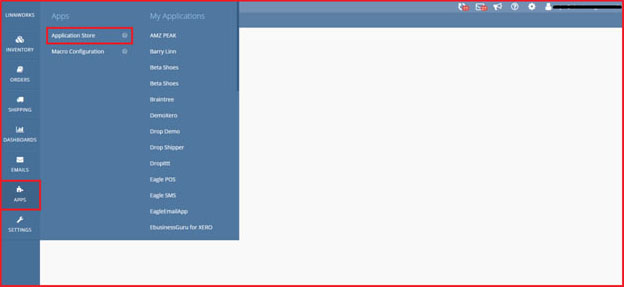
- Login to Linnworks.net
- Select Apps in the left-hand menu bar
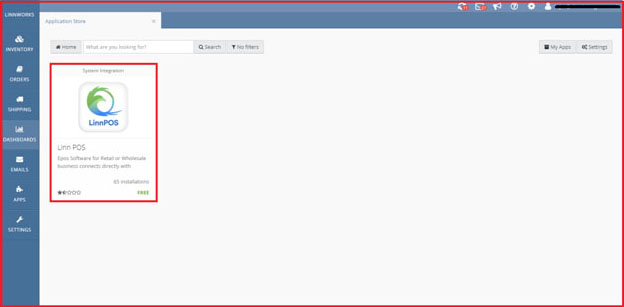
- Click to open the Application Store
- Click on LinnPOS
- Click on Install

Step 2:How to open Linn POS App
- Log into Linnworks.net.
- In the left menu, select Apps, then select LinnPOS from the sub menu.
- The registration page will open. Tick the box to accept terms and condition and click the Register Now button.
- Once the registration is successfully completed, select the location based on where you want to update stock/orders.
- After you select the location, the app will ask for the subscription – select the package that is appropriate for you and click Subscribe.

Step 3: Basic Settings
Synchronization
Order If this option is selected, the app will only create orders in Linnworks which are created on LinnPOS with the status Processed.
Stock Adjustment If this option is selected, the app will update the stock on Linnworks however many are sold.

Receipt Config
Sales Type
Retail If you will select this option, all prices are displayed including VAT.
Wholesale If you will select this option, all prices are displayed excluding VAT.
Receipt Display Name will show as the title of receipt when sales/refund/exchange receipt will print.
Receipt Header will show below the receipt display name. You can set the address/any other information in this.
Receipt Footer will show at the bottom of the receipt.
Receipt Paper Size will show at the bottom of the receipt.
Log the selected logo will be displayed on the receipt header. Select Clear Logo and choose a jpg file with the size 120×90 so your logo displays correctly in the header.

Step 4: Sales
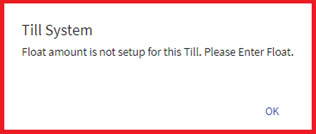
- Float Setup: First need to float for the selected location orders. If float is not setup and you will open POS screen it will alert for float amount is not setup for this till.
 Once you click on “OK” button it will open the enter float screen. Enter the float amount and click on “Done” button.
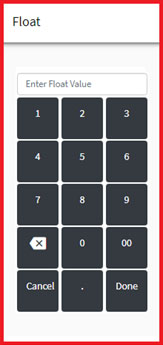
-
Product Search
On POS screen left side you can see the product search bar to enter the product SKU/Title/Barcode.

Enter the product you want to search it will show the product list.

Click on the product which you want to add for sale. That selected product will added into the sales.

For make payment click on “Pay” button so it will open the payment screen.

Enter amount/ direct click on payment method to complete the transaction. It will open the print receipt screen.

Notes: If you want to remove printer selection popup at the time of printing order receipts(Sales/Refund/Exchange/etc.) then email us at [email protected]
-
Refund/Exchange:
•For start Refund/Exchange transaction need to click on “More” button and then click on relevant transaction type.


Exchange: One you start the exchange you need to first select the product you want to exchange and then click on Return To Sale to add product which is given to that exchange products.
Step 5: Product Configurations
Customer Type Wise Price Configuration
To configure customer type wise price, first configure customer type.
Open the product in which you wish to configure customer type wise price.
In that product, add extended properties “LINNPOS_CUSTOMERTYPEPRICE_[Name Of Customer Type Use In Customer Type Configuration]” with value as price.
Example: If customer type is “Distributor”, to add the price 2.25 then we need to add extended properties “LINNPOS_CUSTOMERTYPEPRICE_Distributor” with value “2.25”.
Product Multiple Quantity Price Configuration
Open the product that you wish to configure the product multiple quantity price.
In that product, add extended properties “LINNPOS_MULTIPRICE_[Quantity]” with value as single product price.
Example: If any one buy product two (2) quantity then you want to sell product with price 1.25 then need to add extended properties “LINNPOS_MULTIPRICE_2” with value “1.25”.
Product Sales Price Configuration
If you don’t want to use product basic details retail price, open the product in which do you wish to configure product sales price.
In that product add extended properties “LINNPOS_SALESPRICE” with value as product price.
Combo Offer Configuration
If you want to configure combo offer then first configure Offers.
Offer Type:
MultiBuy: When customer buy any two or based on configuration products from the selected product list then this offer will be applied.
CombinationRight:When user selects any two or based on configuration products from the selected left and right product combination, this offer will be applied.
When the new offer is added, open the product you want to add into the offer.
In that product add extended properties “LINNPOS_OFFER_[Offer Name]” with value as side based on the offer type.
Example: If you have create one MultiBuy offer with name “Buy One Get One” then Extended properties name is “LINNPOS_OFFER_Buy One Get One” with value “LEFT”.
Step 6: Cashing Up
- Click on More – from that option click on Cashing Up. The app will ask for the cash declaration available in safe.
- Once you enter the declaration, click on Done. The app will ask for the float amount you want to keep.
- Once you have entered the float, the app will show the cashing up reports.